Thursday, September 5, 2013

Apple Pie Bars


     It's still summer, but I'm already craving the fall flavors.  The cinnamon, nutmeg, and of course, the fresh, crisp, perfect apples. 

      Sadly, apple season isn't quite here yet.  I know because my mom hasn't brought home any boxes from the farmer's market, and I haven't been eating my wonderful "apple a day." And my mom isn't making her "famous" apple pie every weekend to get rid of all the apples that we haven't managed to eat.  

      Still, my sister made me make these for her and her boyfriend a while ago, because apple pies just can't be limited to apple season.  

       Apple pie has always been my favorite.  If you can believe, I used to not like pie, but then apple pie finally changed my mind.  As I said, my mom makes apple pie frequently.  Her pie consists of apples that have been sitting in the fridge for a while, cut thick, and a store-bought crust which she always has difficulty rolling out.  It's not like those fancy double-lattice, two-different-kinds-of-apples pies, but it's delicious in it's own way.   Inspired, I made these simple but ever-so-delicious apple pie bars.


     In short, buttery shortbread crust+ gooey apple pie filling + crumbly oat topping = pass me a shovel, please.  The great thing about this formula (you know, besides the crumb topping and shortbread and apple parts) is that you can substitute any kind of fruit pie filling in place of the apples.  

     How are you preparing for fall?

Apple Pie Bars

makes one 9x13" pan (around) 18 squares

Ingredients

For the shortbread crust:
1 cup butter
1/2 cup confectioners' sugar
2 cups all-purpose flour
1/4 teaspoon baking powder

For the apple pie filling:
1 cup water
1 Tbsp apple juice, apple cider, or lemon juice
1 cup sugar
1/4 tsp ground cinnamon
1/4 tsp ground nutmeg
1/4 tsp ground clove
1/4 cup cornstarch
1/4 tsp vanilla
3 cups apples (I used Granny Smith), cored, peeled, and chopped

For the crumb topping:
3/4 cup walnuts
3 cups quick-cooking oats
2 cups all-purpose flour
1 1/2 cups light brown sugar
1 1/4 teaspoons cinnamon
1/2 teaspoon baking soda
1/2 teaspoon kosher salt
3 sticks unsalted butter, cut into 1/2-inch cubes and chilled

Directions

  1. Make the shortbread crust: Preheat oven to 350*F.  Cream together the butter and confectioners' sugar. Blend in the flour and baking powder. Pat into a 9x13" glass dish.  Bake in preheated oven for 12-15 minutes, until the edges are light golden brown. Let cool.
  2. Make the apple pie filling: While the crust is baking, combine water, juice, sugar, cinnamon, nutmeg, clove, and cornstarch in a large saucepan. Stir over medium heat until it boils. Cook for 2 minutes, constantly stirring. Remove from heat and stir in vanilla and apples.  Let cool to room temperature.
  3. Make the crumb topping: Toast the walnuts at 350*F for 2-8 minutes, until golden brown and fragrant.  In a medium bowl, combine the oats, flour, sugar, cinnamon, baking soda, and salt.  Blend in the butter with your fingertips, until the mixture is coarse and has clumps the size of peas.  Chop the walnuts and stir into the rest of the ingredients.
  4. Assemble and bake: Preheat oven to 375*F. Pour and smooth the apple pie filling over the shortbread.  Sprinkle the crumb topping evenly on top.  Bake for about half an hour, until the topping is golden brown and the filling is bubbling.  Let cool to room temperature and then cut into squares. 


Sunday, September 1, 2013

Mini Banana Dulce de Leche Cupcakes


          In a way, mini cupcakes have a higher standard than regular cupcakes.  Those two bites have to have the perfect texture and flavor so that you aren't left with a feeling of disappointment. It's like what I learned in statistics class: the smaller the data sample, the more representative everything has to be or you'll get the wrong impression.  

         These cupcakes are fluffy ans moist, with a strong banana flavor because of the mashed bananas.  They are fluffier than banana muffins, and they are truly banana flavored.  There isn't any cinnamon or nutmeg to distract.  I made dulce de leche Swiss meringue buttercream with some left over dulce de leche I had from these cookies.  The caramel flavor added more intensity to the cupcake, I think.  I topped them off with candied walnuts, which added crunch and tied all the flavors together.  The walnuts are coated in caramelized sugar and so they add more of that caramel flavor.  

         They were some fine specimens of cupcake.  
First, cream together the butter and sugar. 
Beat in eggs and stir in 2 ripe mashed bananas (I pureed the bananas in a blender). Stir in baking soda that has been dissolved in hot milk.
Fold in the sifted dry ingredients.
Portion out the batter, filling the liners 3/4 of the way. 
Bake and they will get puffy. Then let cool. 
Make a Swiss meringue buttercream, following the normal procedure: heat egg whites and sugar over simmering water, beat until firm, cream in butter, and mix in flavorings (dulce de leche).

     Then just frost the cupcakes, top with candied walnuts, and enjoy! The cupcakes will keep at room temperature for a few days.  

Banana Cupcakes with Dulce de Leche Buttercream

makes 3 dozen mini cupcakes, or 18 standard cupcakes

Ingredients

for the cupcake:
125g (4oz + 1 tbsp) unsalted butter
175g (6oz) sugar
2 eggs
2 large mashed ripe bananas
1 tsp Baking soda
2 Tbsp boiling milk
1/4 tsp salt
1 tsp baking powder
225g (8oz) flour

for the buttercream:
2-1/2 large egg whites
3/4 cup sugar
2 sticks unsalted butter, diced and softened
1/8 teaspoon salt
1-1/2 tsp vanilla
1/4-1/2 cup of dulce de leche, room temperature 

candied walnuts, follow directions here 

Directions

  1. Preheat oven to 325*F.  Line cupcake pan with paper liners.
  2. Cream butter & sugar till light and fluffy. Add eggs one at a time, beating well after each addition.  Mix in mashed bananas.
  3. Dissolve the baking soda in the hot milk and stir into the banana mixture.
  4. Sift together the flour, baking powder, and salt and fold into the wet ingredients until incorporated.
  5. Fill cupcake liners 3/4 full with batter.  Bake in over for 10-12 minutes if you're making mini cupcakes, or 18-25 minutes if you're making standard cupcakes.  They should be light golden brown and a toothpick should come out clean.  Cool the cupcakes on a wire rack.
  6. To make the buttercream, combine egg whites and sugar in a bowl placed over simmering water. Bring the mixture to 150 degrees F while whisking constantly.
  7. Transfer mixture to stand mixer bowl, fitted with a whisk attachment and beat on medium speed until mixture cools and doubles in volume and forms firm peaks when the whisk is pulled up out of the meringue.
  8. Add butter in one piece at a time, mixing to incorporate after each addition. Add salt and vanilla and mix to combine. Add dulce de leche and mix to combine.
  9. Frost the cupcakes and top with candied walnuts.  Keep at room temperature. 


Thursday, August 22, 2013

Dulce de Leche Stuffed Mexican Chocolate Cookies


       I'm in the process of coming up with some recipes for a themed bake sale I'm holding at school.  The particular theme I'm working on is "ancient civilizations," which is pretty hard since ancient people basically ate some type of meat and grain, and that was it.  Anyways, I came up with these cookies to represent the ancient Incas, since they lived in what is now Mexico and (fortunately) had access to cocoa beans.  


       This is a thick, dark chocolate cookie with a dash of cinnamon, filled and stuffed with dulce de leche. The good thing about stuffing the cookies with dulce de leche is that the filling never hardens and always remains gooey.  Other caramel-stuffed cookies have to be eaten warm.  Also, these cookies are big, about the size of the palm of your hand, so they are perfect for selling.  

        Dulce de leche is a common Mexican ingredient, which is like carmelized milk.  You can buy it at a grocery store, or you can make it by yourself out of sweetened condensed milk.  Since I had a can of sweetened condensed milk already sitting in my pantry, and curiosity, I decided to go with the latter option. 


         There are lots of ways to make dulce de leche (just google it).  I chose the oven method.  All you need is a roasting pan, hot water, a glass dish that fits in the roasting pan, an oven, and a can of sweetened condensed milk.  
Place one can of sweetened condensed milk in a glass dish. I used a pie plate.
Cover the dish tightly with foil.
Place the dish in the roasting pan.  Pour hot water into the pan until it reaches halfway up the sides of the glass dish. Remove the dish from the roasting pan, and place the roasting pan on the bottom rack of the oven.  Preheat the oven to 425*F. 
When the oven is heated, place the glass dish back into the roasting pan.  Bake for 1 hr and 15 minutes.  Check the water level in the pan every half hour and add water if necessary.  Take the glass dish out of the oven and let cool for at least  hour. 
Remove the foil.  You should have a deep brown caramel. 
Stir the dulce de leche in a bowl until smooth and refrigerate until completely cool.  
     Making the cookies is very simple.  To start, you make a simple chocolate cookie dough.  It will be very thick.
Make the chocolate cookie dough.
Make a cinnamon-sugar mixture out of 3 tbs granulated sugar, 1 tsp cocoa powder, and 2 tsp cinnamon.

Scoop rounds of tbs of cookie dough onto a parchment-lined baking sheet,  1-1/2 inches apart.  Then scoop about 1 tsp of  dulce de leche on top.

Scoop another 2 tbs of chocolate cookie dough on top of the dulce de leche.  Pinch the dough into a ball to enclose the dulce de leche.  Roll it in the cinnamon sugar and place back on the baking sheet.  Press the dough down to a make a disk about 3/4" in diameter. 
 Bake at 350*F for 16-20 minutes.  Let cool.
Pipe more dulce de leche on top. 
       I was excited to make these cookies and I'm happy with how they turned out.  I already had all the ingredients at home, so I didn't have to wait for anyone to take me to the grocery store (which I hate doing; once I have a recipe in my mind, it's all I can think about until I actually make it).  The cinnamon and dulce de leche really add flair to the rich but ordinary chocolate cookies.

        If you want a spicier Mexican chocolate cookie, try adding 1/4 tsp chili powder to add warmth.

      Enjoy!

Dulce de Leche Stuffed Mexican Chocolate Cookies

makes 12 large cookies
adapted from My Baking Additction

Ingredients

For the Cookie Dough:
2 sticks cold and cubed unsalted butter
1 cup granulated sugar
1/4 cup light or dark brown sugar
2 eggs
1/2 cup good quality dark cocoa powder (like Hershey's Special Dark)
2 1/4 cups all-purpose flour
1/2 tsp coarse salt
1 teaspoon baking powder
1 tsp ground cinnamon
For Finishing:
about 1 cup dulce de leche (see above for instructions for homemade)
3 tbs granulated sugar
2 tsp ground cinnamon
1 tsp cocoa powder

Directions

  1. Preheat oven to 350*F.  Line 2 baking sheets with parchment paper or silicon baking mats.
  2. In a large bowl, cream together the butter and sugars until well-combined. Then beat in the eggs, one at a time.  Mix in the cocoa powder well.  
  3. Whisk together the flour, salt, baking powder, and cinnamon in a medium bowl, and then fold into the wet ingredients until combined.  
  4. Scoop 2 tbs of dough onto the cookie sheets, 1-1/2 inches apart.  Scoop 1 tsp of dulce de leche on top of the dough, and then scoop another 2 tbs of dough on top.  
  5. Pinch the dough around the dulce de leche filling to form a ball.
  6. In a small bowl, whisk together the sugar, cinnamon, and cocoa powder for finishing.  Roll the balls of cookie dough in the sugar mixture and place back on the cookie sheets.  Press the dough balls into 3/4" thick disks.  
  7. Bake the cookies in the preheated oven for 16-20 minutes.  Let cool on the pans for 5-10 minutes, then transfer to a cooling rack to cool completely.
  8. Fill a piping bag with dulce de leche and pipe onto the cooled cookies in any pattern you wish.  Store the cookies at room temperature in a sealed container.  


Thursday, August 15, 2013

Lemon Raspberry Layer Cake

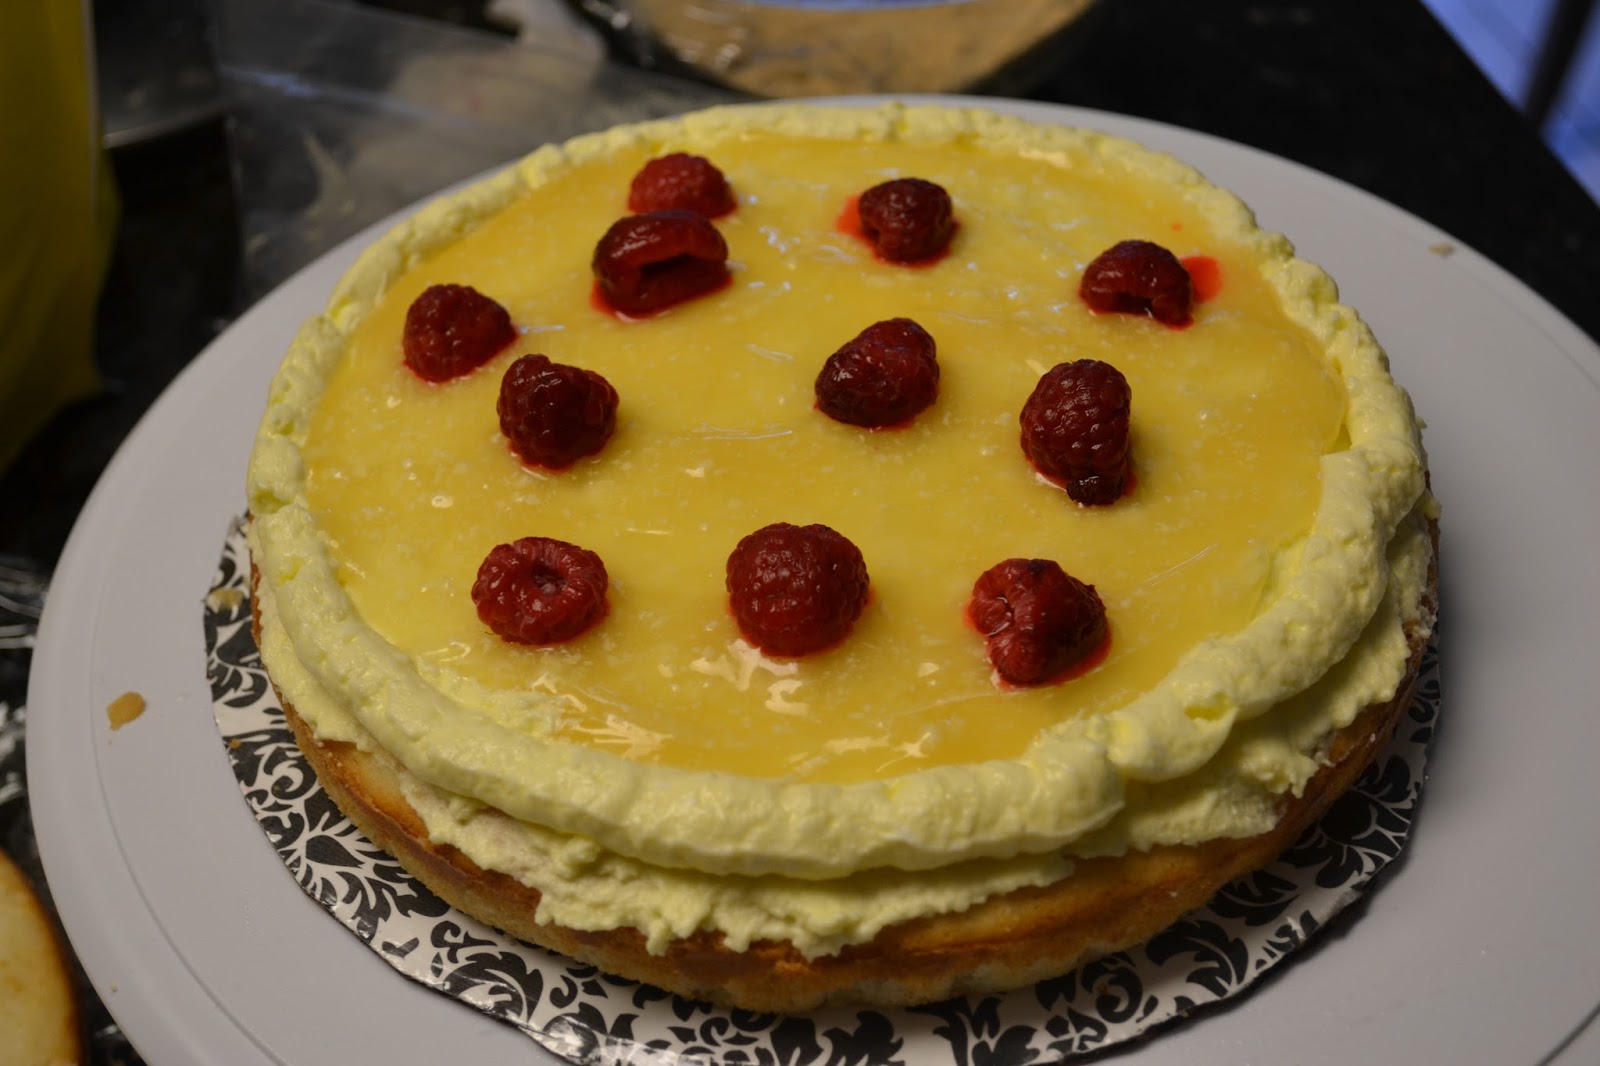
     The third and final thing I baked for the fair was this lemon-raspberry cake. It's a good thing I took pictures because the frosting was messed up once I got to the fair.
        I only had to submit half of the cake, so my family and I got to eat the other half.  I also got to take a picture of the inside layers of the cake before I actually sliced it.  You can see the raspberries dotting the inside of the cake.

       The cake is a lemon sponge cake that has been moistened with a lemon syrup, and it is filled and frosted with lemon curd Swiss meringue buttercream.  There is also lemon curd and raspberries spread between the layers.  I used store-bought lemon curd since I was short on time (I had one day to bake 3 entries).  Plus, the lemon curds I have made in the past all had this sort of metallic taste, maybe because of the pan I used.  I had frozen raspberries in my freezer which I thawed to put on the cake, but fresh raspberries probably would have held their shape better.  

         The cake was fluffy and moist and the raspberries and lemon curd gave it a nice tartness to balance the sweet.  The swiss meringue buttercream was smooth and light, like most Swiss meringue buttercreams, and had a subtle lemon flavor which complemented the cake.  

          The fair results also turned out great.  All three of my entries were awarded a blue ribbon, and my macarons received best in show for teen baking! It was a pleasant surprise, especially since the appearances of the cake and cupcakes were messy.  I guess it's taste that really matters.

           Enjoy!

First, cream together 1 cup of the sugar, butter, and oil for the cake batter.
Sift together the dry ingredients and fold them into the butter mixture in 3 additions, alternating with milk. 
Whip the egg whites to soft peaks, and then beat in 1/3 cup of sugar.
Gently fold the egg whites into the batter.
Distribute the batter into 3 pans and bake until light golden brown and springy. Let cool.
Bring the syrup ingredients to a boil and then let cool.
Trim the top of the cakes off and brush the syrup on top.
Start the buttercream by gently stirring the egg whites, sugar and salt together in a large bowl over a pot of simmering water.  Stir until hot to the touch, or 160*F. 
Remove the bowl from the heat and whip until the mixture becomes a thick, glossy meringue, and the sides of the bowl are no longer warm.
Beat in the butter.
Add the lemon zest, vanilla, and food coloring, if desired. 
Spread some buttercream on top of the cake, and pipe a border around the edge to hold in the curd and raspberries.  
After stacking the layers, give the cake a crumb coat of buttercream and chill for half an hour to make decorating easier.
Frost the cake, pipe a decorative border, and spread some lemon curd on top of the cake.  Top with more raspberries and enjoy.  It tastes best served at room temperature.

Lemon Raspberry Layer Cake

adapted from Flour by Joanne Chang
makes one 9" 3-layer cake

Ingredients

For the cake:
6 tbs unsalted butter, at room temperature
6 tbs canola oil
1-1/3 c. sugar, separated
2 tsp vanilla extract
1 tbs grated lemon zest (from about 2 lemons)
3 c. (360g) cake flour
1 tbs baking powder
1/2 tsp coarse salt
1 c. whole milk, at room temperature
6 egg whites, at room temperature 
For the syrup:
1/2 c.  fresh lemon juice (3-4 lemons)
1/2 c. water
3/4 c. sugar
For the Swiss meringue buttercream:
7 egg whites 
1-1/2 cups sugar
Pinch of salt
2 cups unsalted butter, softened and cut into cubes
1/4 cup lemon curd
1 teaspoon pure vanilla extract
Yellow food coloring (optional)
For assembly:
about 2 cups lemon curd
raspberries

Directions

For the cake:
  1. Place a oven rack in the center of the oven, and preheat the oven to 350*F.  Butter and flour 3 9" cake pans, line with wax paper, and butter and flour the wax paper.  
  2. In a large bowl, cream together the butter, oil, and 1 c. of the sugar, until light and fluffy.  Scrape the sides of the bowl and beat in the vanilla and lemon zest.  
  3. In a medium bowl, sift together the flour, baking powder, and salt.  Add the flour to the butter mixture in 3 additions, alternating with the milk in 2 additions, and stirring until incorporated.
  4. In a large bowl, whip the egg whites to soft peaks (they will hold and then droop).  Add the remaining 1/3 cup of sugar and beat the egg whites for another couple of minutes, until the whites hold their peaks. Gently fold the egg whites into the rest of the batter and divide the batter into the cake pans.  
  5. Bake the cakes for 25-30 minutes, until they are light golden brown and their centers spring back when lightly touched.  Let them cool in their pans for 20 minutes, then turn them out of the pan and wrap in plastic wrap.  Refrigerate for 1/2 an hour, or until completely cool.  
  6. In a small saucepan, combine the ingredients for the syrup.  Bring to a boil over medium heat and then let cool to room temperature.
  7. When the cakes are cool, trim off the tops to even the layers, and brush the tops evenly with the syrup.  
For the buttercream:
  1. Wipe a heatproof bowl with a paper towel and lemon juice, to remove any trace of grease. Add egg whites, sugar and salt, and simmer over a pot of water, whisking gently, until temperature reaches 160°F, or hot to the touch. 
  2. Whip the egg white mixture until it is thick and glossy, and the sides of the bowl feel neutral, not warm. 
  3. With a mixer on low speed, add the butter cubes a few at a time and mix until incorporated. Increase mixer speed to medium and whip the buttercream until it is thick and glossy.
  4. Add the lemon curd and vanilla and beat until well combined. Add food coloring, if desired, and beat to combine.
For assembly:
  1. Spread about 1 cup of buttercream onto a cake layer brushed with syrup.  Pipe a border of buttercream around the edge of the cake.  Spoon and spread about 1/2 a cup of lemon curd on top of the buttercream, and sprinkle a handful of raspberries on top. Place another cake layer on top and repeat.  Place the third cake layer on top.  Frost the cake with a light coat of buttercream, and then refrigerate for 1/2 an hour. 
  2. Frost the cake with more buttercream and pipe a decorative border around the rim.  Spread a thin layer of lemon curd on top of the cake, and garnish with raspberries.