Sunday, March 17, 2013

Irish Soda Bread

     Hi everyone! Happy St. Patrick's Day! 
     I just came back from NYLSC today, which is a conference where I learned how to be a good leader and stuff.  That may not sound too fun, but I met so many great people and gained so much valuable information there!
     One thing I really missed though was home cooking.  Not that the food was bad (it was pretty good!).       It was like college food, I guess, and I now understand why college students are always so eager to get some homemade food.
      And now back to St. Patrick's Day.  Fun fact:  I'm an eighth Irish!  So, of course I'm going to celebrate St. Patrick's Day.  It's always been a favorite holiday of mine.  I remember believing in leprechauns, dressing all in green, and eating a bunch of green food on this special day when I was younger.  Having a green food party is actually a pretty clever way to convince kids to eat vegetables.
      Today I tried making some genuine Irish soda bread for the first time.  It uses baking soda and buttermilk to make it rise, which is pretty cool.  And it only uses 4 ingredients and doesn't need any proofing time.  Sounds pretty good already.
       Of course you can jazz up this traditional bread by adding raisins, chocolate chips, herbs, sun-dried tomatoes, or anything else.  Today, though, I just wanted to experience the classic bread which has been made in Ireland for hundreds of years.
       Here's what you do:
Mix together the dry ingredients and make a well shape.
Pour in the buttermilk 

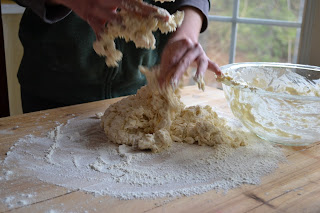
Mix with one hand just until a soft  dough starts to form and the milk is absorbed.
Place dough on a well-floured surface
Flip it over so the floured part is on top
Score it with a sharp knife so that there is a 1/4" deep X .
Bake it until it's brown and it sounds hollow when tapped on the bottom. 

     Here are some useful tips:

  1. Make sure the oven is preheated before the dough is ready.  As soon as you mix the buttermilk and baking soda together, they start reacting and the dough needs to get in the oven asap to rise as much as possible.  
  2. Work the dough gently with your hands and don't over-mix.  
  3. The dough round should not be more that 1-1/2" thick in the middle before baking because if it's too thick, it won't rise as much.  
  4. Score the bread before baking so that heat can reach the center.  This is also said to "let the fairies out."
  5. If you want to try a softer, tender crust, you can cover the bread in a clean, unscented towel while it cools.
  6. Try mixing in caramelized onions, herbs, sun-dried tomatoes, raisins, or chocolate chips.  
  7. 1 cup buttermilk = 1 tbs vinegar+enough milk to make one cup  (stir and let sit 5 minutes)

     I could have made my loaf look better, but it definitely has a great flavor.  The hardest part is waiting those 2 hours for the bread to cool.  Now you may be wondering, "What is she going to eat with this lovely Irish bread?"  Well, the answer is Chinese food, duh.
     Enjoy!

Irish Soda Bread

makes 1 large loaf (serves 8)
recipe from Fine Cooking

Ingredients

1 lb. (3-1/2 cups) all-purpose flour
3/4 tsp baking soda
1/2 tsp salt
1-1/2 cups to 1-3/4 cups buttermilk

Directions

  1. Preheat the oven to 450*F.  Sprinkle a large rimmed baking sheet with flour.
  2. Mix together the dry ingredients in a large bowl and then make a well shape.
  3. Pour in 1-1/2 cups buttermilk and lightly stir the mixture in a circular motion just until the dough comes together.  Add more milk by the tbs if the dough is too dry.
  4. Turn the dough onto a well-floured surface and pat into a circle shape about 6-3/4" across and 1-1/2" high in the middle. Flip over so that the floured side is up.  
  5. Score the bread about 1/4" deep with a sharp knife, making and X.  Make sure you get the dough's full diameter from end to end.
  6. Transfer to the baking sheet and bake in the preheated oven for 15 minutes. Then lower the oven's temperature to 400*F and bake for another 20-30 minutes, until the bread is brown and sounds hollow when you tap the bottom.
  7. Transfer to a cooling rack and let cool to room temperature (takes about 2 hours) before serving.  

Wednesday, March 13, 2013

Bubble Tea from Scratch


     You've all heard of bubble tea, right?  I've always enjoyed it at the stand in the mall, especially after 7th grade when I last visited China.  Now, every time I see a new bubble tea place, I have to try it.  I've had hot, cold, taro-flavored, lychee-flavored, and any other type or flavor of bubble tea you could think of.  I can't get enough of that creamy tea flavor and the feeling you get when you suck a tapioca pearl through a big, colorful straw.
      So I decided to make myself some bubble tea at home.  I've made the milk tea part before, but not the tapioca pearls.  The milk tea is basically milk, black tea, and sugar mixed together and chilled.  The tapioca pearls are just tapioca starch (or flour) mixed with hot water and cooked in a pot of water and brown sugar. The tapioca pearls turn out wonderfully chewy and with just the right amount of sweetness.  Of course, you could just by tapioca pearls from the store and cook them.


       If you're wondering how they make fancy flavors like taro at stores: they make it from a special flavoring powder you can buy online.  This "original" flavor tastes just as good, though.
What tapioca starch looks like. You can find it in Asian groceries.
Tapioca Pearl Dough
Tapioca pearls before cooking.
To suck up the tapioca pearls, you'll need some fat straws, which I got from Bed Bath and Beyond.  Or you can drink the tea first, and then spoon up the pearls.  You can drink this warm, or chill it to make it cold.
         If you want to make the pearls ahead of time, cook them as directed and then put them in a seal-able container along with some sugar syrup (1 cup water + 1/2 cup brown sugar boiled together until sticky).

          So, with this recipe, you can whip up some fantastic bubble tea any time you want from the comfort of your own home.  And you don't have to pay all that money they charge at stores.  Enjoy!
Cooking the pearls.
Finished pearls (made from scratch)
Bubbles in black tea.
Add caption

Adding the milk.
Finished bubble tea.

Bubble Tea

recipe makes 1 serving (about 2 cups)
adapted from All Recipes

Ingredients

1/3 cup dried tapioca pearls (see recipe below for how to make them from scratch)
2 cups water
1 tsp or 1/4 cup brown sugar (use the bigger amount for white tapioca, the lesser for black tapioca)
1 cup brewed black tea (chill it for cold bubble tea)
2-3 tbs milk
4 tsp sugar 
ice cubes, optional

Directions

  1. In a saucepan, bring the water and sugar to a boil and add the tapioca pearls.  Reduce the heat to a simmer and cook the tapioca, stirring occasionally, for about half an hour, until they are soft and chewy all the way through.  Spoon the pearls into cold water so they don't stick together.
  2. In a tall glass, spoon in the tapioca pearls, then pour in the tea.  Mix in the milk and add ice cubes if desired.

Tapioca Pears

makes about 2 cups pearls

Ingredients

1 cup tapioca starch or tapioca flour
1/3 to 1/2 cup boiling water
1 cup Brown Sugar
About 5 cups additional water, for cooking

Directions

  1. In a large bowl, quickly mix together the tapioca flour and boiling water to form a firm dough, adding more water if it is too dry.  You can add food coloring if you want colorful pearls.
  2. Knead the dough in the bowl until it is smooth and stretchy.  
  3. On a piece of wax paper or a board, roll the dough into thin ropes.  Tear a small, dime-sized piece off of one rope and, between the palms of your hands, roll it into a ball.  Cover the dough you aren't using with plastic wrap so it doesn't dry out.  You can keep the finished balls uncovered.  Repeat with the rest of the dough.
  4. Let the small spheres dry out, uncovered, for at least 2 hours, or up to a day.
  5. Bring about 5 cups of water to a boil and stir in the brown sugar.  Then add the tapioca pearls and lower the heat to a simmer.  Cook, stirring occasionally and adding more water if the mixture gets too thick.  Cook until transparent (30min-1hr).  Then, transfer the pearls into cold water so that they don't stick together.  
  6. If you want to save them for later, place in a seal-able container with the sugar-syrup you cooked them in.  You can also use the syrup to sweeten your bubble tea.
  7. If you want to use these to make bubble tea, go immediately to step two in the recipe above. 


Sunday, March 10, 2013

Boston Cream Whoopie Pies


      There are times when you need a nice, elegant layer cake.  And there are times when you need a whoopie pie.
      Layer cakes are great, but when you need to give someone or carry around a dessert, something portable like whoopie pies are perfect.
       Boston cream pie is traditionally served in layers, but I decided to turn it into a whoopie pie so that my sister could give it to her friend for her birthday.  So these Boston cream whoopie pies combine two different pies:  whoopie pie and Boston cream pie.
        All it is is a vanilla sponge cookie-shaped-cake-thing topped with pastry cream, and another cake with chocolate ganache on top.  Seriously, anything filled with cream is delicious.
        This whoopie pie is like a miniature Boston cream pie that you don't have to share with anyone.  It's amazing.  

First, you have to make the pasty cream and chill it for a few hours.
Whip some egg whites to soft peaks.  The added egg whites helps the whoopie pies to hold their shape better.
Beat butter and sugar together until creamy, and then mix in the egg yolk and the vanilla.
Whisk together the dry ingredients.
Alternate mixing in the dry ingredients in 3 batches and mixing in the milk in 2 batches.
Fold in some of the egg whites to temper the mixture, and then fold in the rest.
Place the batter in a piping bag.
Pipe round circles 1-2" wide and smooth them with a spatula.  I made some big ones and some small ones.  
Bake until the center springs back when you lightly poke it.
Fill with the cream and top with chocolate ganache.
Enjoy!

 Boston Creme Whoopie Pies

makes 12-24 (depending on size)

Ingredients

For the pastry cream:
1 cup half-and-half (or 1/2cup heavy cream plus 1/2cup whole milk)
3 egg yolks
1/4 cup sugar
pinch of salt
2 tablespoons all-purpose flour
2 tbs unsalted butter, cubed
3/4 tsp vanilla extract

For the Cookie:
2-1/4 cups all-purpose flour
1-1/2 tsp baking powder
3/4 tsp salt
1/2 cup (1 stick or 4oz) unsalted butter, room temperature
3/4 cup sugar
1 large egg yolk plus two large egg whites
1/2 tsp vanilla extract
1/2 cup whole milk

For the chocolate ganache:
1/4 cup heavy cream
2 oz semisweet chocolate, chopped

Directions

  1. Make the pastry cream a few hours ahead of time or the day before.  In a small saucepan, scald the half-and-half (it should be steaming and have a few bubbles coming to the surface). Meanwhile, whisk together the egg yolks, sugar, salt, and flour in a medium bowl.  Slowly add the half-and-half to the egg yolk mixture while whisking constantly.  Return to the saucepan over medium heat and cook, whisking constantly, until it's slightly thickened.  Lower the temperature to medium-low and continue cooking, still whisking, until bubbles burst on the surface.  Strain into a bowl and refrigerate for at least 2 hours. 
  2. For the cookie: Preheat the oven to 350*F and line two baking sheets with parchment paper. Whisk together the flour, baking powder, and salt and set aside.
  3. Cream together the butter and sugar, then add the vanilla and egg yolk.  Mix until well-combined.
  4. Add 1/3 of the dry ingredients to the egg mixture and stir until incorporated.  Then add half of the milk and stir. Then repeat, alternating dry ingredients with milk.  
  5. Beat the egg whites to soft peaks and then fold  1/3 of it into the other mixture.  Then fold in the rest.
  6. Place the batter in a piping bag and pipe circles 1"-2" wide onto the baking sheets.  Smooth the tops with a spatula and bake for 8-10 minutes, until the centers spring back when lightly touched.  Cool on baking sheets, then move to a wire cooling rack. Pair up cookies that are the same size.
  7. For each pair of cookies, spoon or pipe some filling on one and then sandwich the other cookie on top.  
  8. Make the ganache by bringing the heavy cream to a boil, and then pouring it over the chocolate in a bowl.  Stir until smooth.  Then, dip the whoopie pies in it, or wait for it to cool and spread it over the tops of the cookies.  


Wednesday, March 6, 2013

Homemade Oreos

     Did you know that March 6th is national Oreo day?  That's today, so it's the perfect time to make homemade "oreos" (or should I say chocolate sandwich cookies) from scratch.

They spell out "Krumbli," see?
I didn't plan this, but a lot of the cookies grew faces :)
     To be honest, I'm not a big Oreo fan.  Yes, it's America's Favorite Cookie, but the only time I ever ate them was at parties; my family never bought them.  To me, they just tasted too fake.
      These aren't exactly like oreos, but they are really, really close. They have that crunchy cookie and intense chocolate flavor. The difference is that these don't have that fake taste you get in the store-bought kind. These, unlike a lot of other recipes, don't use shortening.
      I made two kinds of fillings for these: peanut butter and vanilla.  Let me just say that the peanut butter one was out of the world, and the vanilla one was really good too.  You can use one or the other, or both. Next time, I think I'll try making mint oreos.  It would be like my favorite ice cream flavor: mint cookies and cream.
      I also cut half of the cookies into flower shapes.  You can make them any size, but note that smaller ones will take less time to bake.
       Enjoy!
Step 1: Make the dough
2.  Roll the dough into a compact cylinder about 2" in diameter, or roll into a 1/4" thick sheet.
3. If you rolled out a sheet, cut out shapes. 
4. If you made a cylinder, cut into 1/4" slices.
5. Bake
6. Make filling. (Vanilla)
Peanut butter filling.
7. Fill.
8. Enjoy.

Homemade Oreos

makes 16-24 cookie sandwiches, depending on size
adapted from Flour by Joanne Chang

Ingredients

1 cup semi-sweet chocolate chips, or 6oz semi-sweet chocolate, chopped
1 cup (8oz, 2 sticks) unsalted butter, melted
3/4 cup (150g) white granulated sugar 
1 tsp vanilla extract
1 large egg
1-1/2 cups (210 g) flour
3/4 cup (90g) dutch-processed cocoa powder (I couldn't find this, so I used special dark cocoa)
1 tsp coarse salt
1/2 tsp baking soda
1 recipe vanilla cream filling or 1 recipe peanut butter filling (recipes below)

Directions

  1. Place butter and chocolate in a large bowl and microwave at 30-second intervals, stirring in between, until the mixture is smooth and blended. Let cool slightly, then whisk in sugar.  Whisk in vanilla and egg until well-incorporated.
  2. Whisk together flour, cocoa, salt, and baking soda in a medium bowl.  Add to chocolate mixture and stir with a wooden spoon, or by hand.  It will feel like sticky play-doh. Mix until homogeneous.
  3. Place the dough on a square of wax paper. 
  4. For circular cookies, roll into a tight cylinder with a diameter of 2" and wrap wax paper around.  Refrigerate for 2 hours, taking it out and re-rolling it every 15-30 minutes so that it stays round.  (The dough can then be refrigerated for up to a week, or frozen.) Cut into 1/4" thick disks.
  5. For cut-out cookies, roll the dough into a 1/4" thick sheet.  Refrigerate for at least 1 hour, until firm, and then cut into desired shapes.  Then refrigerate for another hour before baking.
  6. Preheat oven to 325*F.   Place dough onto parchment lined baking sheets, 1 inch apart.  Bake for 15-25 minutes, until the centers are firm to the touch.  Let cool on baking sheets until room temperature.  
  7. Spoon some filling on one cookie, and then gently press another cookie on top.  

Vanilla Cream Filling

enough to fill one batch chocolate sandwich cookies
from Flour by Joanne Chang

Ingredients

1/2 cup unsalted butter, softened
1-2/3 cups (230 g) confectioners sugar
1 tsp vanilla extract
1 tbs whole milk
pinch of salt

Directions

  1. Beat butter for 30 seconds, until creamy.  Add sugar and vanilla, and mix with mixer or by hand until completely smooth (it will be crumbly at first, but will eventually feel like play-doh).  Stir in milk and salt.

Peanut Butter Filling

enough to fill one batch chocolate sandwich cookies
from Flour by Joanne Chang

Ingredients

1/4 cup (1/2 stick) unsalted butter, softened
3/4 cup (105 g) confectioners sugar
1/2 cup smooth peanut butter (I used all-natural)
pinch of salt

Directions

  1. Beat butter for 30 seconds, until creamy.  Add sugar and mix with mixer or by hand until completely smooth (it will be crumbly at first, but will eventually feel like play-doh).  Mix in peanut butter and salt.

Tuesday, March 5, 2013

Easy Baklava Cups


     Hello everyone!  How are things?  I know I haven't posted in almost forever (7 days), but I've been kind of busy.  And I cannot wait until spring break.
     Anyways, you wanna know what those gems up there are?  Let's call them a "rustic" version of baklava-- you know, that delicious Greek dessert made from phyllo, honey, and nuts?  The only change I made was putting the dessert into cups, kind of like those brownie-cookie bites I made earlier.  It's funny how the reason I make these bite-sized things is because I don't have enough ingredients or materials to make the full version, and the cute little desserts turn out even better.  Seriously, these would be great at a party.  
      I didn't have enough phyllo dough to make the full version (I only had 8oz instead of 16), so I decides to make phyllo cups.  To make the process a lot quicker, you can buy the pre-made, pre-baked cups that you can find in the freezer isle. 
 To make 2 dozen phyllo cups:
Ingredients:
1/4 cup melted butter
at least 10 sheets phyllo (more in case some rip)
some sugar
Directions:
Brush one sheet with butter and sprinkle with sugar, then place another sheet on top.  Repeat until you have 5 sheets stacked on top of each other (the top shouldn't be brushed with butter.)  Cut into 12 pieces.  Repeat for another 12 squares.  
Spray a mini muffin pan (24 cups) with baking spray (or just grease). Press the squares of dough in so they look like cups.  Bake at 375*F for 5 minutes, or until the edges are light brown.  


      Phyllo dough is amazing.  It's so flaky and wonderful. However, it's a but tricky to work with, because if you don't keep the dough covered, it'll turn dry and flaky a little too early, and it'll be impossible to work with.  You should make sure that you have a few extra sheets in case some rip or dry out.  I kept my dough under damp paper towels, and it worked fine.  Also, remember to thaw the dough for 2 hours at room temperature or overnight in the refrigerator. 
      The filling is really simple: just toasted walnuts and some spices ground.  You can use any kind of nut, actually.  Toasting them really brings out the flavor.
Place the filling in the cups and bake for 5-8 minutes until the filling is hot and the phyllo is brown.
       What sets baklava apart is it's syrup.  It's simple and made from honey, water, orange peel, and cinnamon.  You should let the baklava sit for 5 hours at room temperature to let the syrup soak in.  I know, I can't wait that long either.  Store the baklava by covering it and keeping it at room temperature.
Syrup in the making.
The product should look something like this.


Enjoy!

Baklava Cups

makes 24 cups
adapted from Brown Eyed Baker

Ingredients

1/4 cup water
1/4 cup sugar
1/4 cup honey
1 cinnamon stick (or a dash of ground cinnamon)
1 strip orange peel (or lemon)
24 phyllo cups, pre-baked and thawed if frozen (see notes above)
1 cup walnuts, toasted (or a different kind of nut)
3/4 tsp ground cinnamon
1/4 tsp ground cloves

Directions

  1. Preheat the oven to 350*F.  Lightly grease a 24 cup mini muffin pan and put in phyllo cups.
  2. Bring water, sugar, honey, cinnamon stick, and orange peel to a boil over medium-high heat, stirring to combine.  Lower heat to medium and let simmer for 10-15 minutes, until the sugar is dissolved.  Set aside.
  3. Place walnuts, cinnamon, and cloves in a food processor and grind until fine.  It's okay if there are a few larger pieces, and you shouldn't process it for too long or it'll become a paste.  You can also just chop the walnuts and mix in the spices.
  4. Place the nut mixture into the phyllo cups.  Bake in preheated oven for 5-8 minutes, until the shells are brown and the filling is hot. Remove from pan and place on a cooling rack.
  5. Pour a spoonful of syrup into each cup.  Let the baklava sit for 5 hours before serving so that the syrup can soak in.  Store, covered, at room temperature.