Showing posts with label homemade. Show all posts

Sunday, October 6, 2013

Whole Wheat Fig Bars


       I've always had a minor obsession with Fig Newtons.  

It's all about the fig filling.
 And the soft cookie exterior.
And the way the cookie just blankets the figs so perfectly and you can't imagine the pair ever being separated.

       Until I found out that my cross country buds liked fig bars, I didn't know anyone who liked Fig Newtons as much as I did.  Through them I discovered a whole wheat type of fig bar with all the "healthy" words on its packaging, which was great since Fig Newtons are pretty bad for you.

         So you may be wondering why I decided to make a different version I could easily buy a pack at a grocery store.  Well, for one thing, making things typically store bought is my idea of fun.  Another thing, my mom doesn't have a Costco membership to buy these whole wheat fig bars.  

        Also (says my inner health fanatic), processed foods are all somewhat unhealthy, and making your own food is better for you.

         I'm really happy with the way these turned out.  Just be aware that its one of those recipes that require chilling, rolling, cutting, and moving around thin pieces of dough, so it would be a good idea to turn your thermostat down (the Fig Newton factories have this advantage of having perfect climate control and machines to do the rolling and assembly). You also need patience.  Mine didn't look very good this time, but they tasted pleasant and I'm sure that next time they'll be a lot better.  

        First thing to do is make the whole wheat dough and refrigerate it for a couple of hours to firm up.  Then you start the filling, which will need to simmer for about 2 hours.  After the filling is cooled down, you roll out the dough, cut it into 3 strips, place some filling in the middle of each strip, fold the dough over the filling, cut the strips into squares, and bake the squares.  Then you get fig bars.  They turn out a little crunchy at first but get soft and chewy the next day. 


Enjoy!

Whole Wheat Fig Bars

makes around 30 fig bars

Ingredients

For the dough:
7oz whole wheat flour
1oz oat flour (rolled oats blended until powdery)
1/8 tsp cinnamon
1/4 tsp salt
1/4 tsp baking soda
1/4 tsp baking powder
4oz (1 stick) unsalted butter, at room temperature
3-1/2 oz sugar
1oz brown rice syrup (or honey/corn syrup)
1 tsp orange zest
2 tsp vanilla extract
1 egg + 1 egg yolk
1 tbs canola oil
1 oz fresh orange juice

For the filling:
1 heaping cup (a bit less that 6oz) dried figs, chopped (I used Calimyrna dried figs)
1-1/2 cups water
1 cup apple juice
1/2 cup sugar
1-1/2 tsp orange zest

Directions

  1. Make the dough: Whisk together the flour, oat flour, cinnamon, salt, baking soda, and baking powder in a medium bowl. In a large bowl, cream together the butter, sugar, brown rice syrup, and orange zest.  Beat in the vanilla, eggs, oil, and orange juice until well blended.  Slowly stir in the dry ingredients until well combined.  The dough will be soft.  Wrap in plastic wrap, pat into a disk, and refrigerate for at least 2 hours.
  2. Make the fig filling: Place the dried figs, water, juice, and sugar in a medium saucepan over medium heat, stirring to combine. Bring to a boil, then lower the heat so that it is at a simmer.  Let simmer, stirring occasionally for 1-1/2 to 2 hours, until it has a thick, jam-like consistency.  Leave at room temperature, refrigerate, or cool in an ice bath until it cools down.  Place the jam in a blender with the orange zest and blend until smooth.
  3. Assemble: Preheat the oven to 350*F. On a floured surface, roll out the chilled dough into a rectangle that is roughly 12x14".  Cut into 3 rectangles that are 4" wide. Spread a line of fig filling through the center of each strip of dough.  For each strip, fold one side of the dough over the filling, then fold the other side over that, enclosing the filling.  Roll the logs seam side down and place each onto a parchment lined baking sheet (I find it easier to move if you cut each log in half first). If you can, chill the dough.  Cut each piece into 30 smaller pieces and space them apart on the baking sheet.  Bake in the preheated oven for 12-15 minutes, until the edges are golden.  Let cool on wire racks.


Wednesday, July 10, 2013

Cherry Almond Granola Bars


          I recently went on a camping trip, which for me means two things: s'mores and granola bars.

           Granola bars are perfect for traveling and snacking, and their oaty flavor is kind of addicting.  I especially like the soft, chewy kind of granola bars since they don't leave a lot of crumbs.  I decided to try to make my own granola bars, and they turned out like a granola bar should turn out.

           I made chewy cherry almond granola bars.  Cherry and almond is another one of those classic flavor combos.  The tartness of the dried cherries paired well with the sweet honey and the almonds added a nice crunch to the chewy granola bar.

         The granola bars I made don't actually have granola, but use toasted oats instead.  To make the granola bars chewy, I added puffed brown rice, which I found in the "healthy" section of the grocery store.  You could use regular white crispy rice, too.  It's kind of like making rice krispy treats, expect you don't use marshmallows and butter, and you bake the granola bars.

First, you toast some old-fashioned oats.
You stir the oats with the puffed rice, almonds, and cherries.
Then you make a syrupy sort of thing with honey.  This is what holds the bars together.
Bring the syrup to a boil.
Stir into the oat mixture.
Press into a pan.
Bake until golden brown and let cool for a few hours.
Cut into pieces and you have granola bars!
            The granola bars had the right texture, I think, but they had a distinct honey-like flavor and didn't hold together that well.  I suggest that you be careful when storing them.  In the future, I'm definitely going to make more granola bars.  Enjoy!

Cherry Almond Granola Bars

recipe adapted from Can You Stay for Dinner
makes about 2 dozen granola bars

Ingredients

2 cups old-fashioned oats
1 cup chopped or slivered almonds
1 cup puffed brown rice cereal, or white crispy rice
1 cup dried cherries 
2 tablespoons unsalted butter
3/4 cup honey
3 tablespoons light brown sugar
1 teaspoon pure vanilla extract
1/4 teaspoon almond extract
1/2 teaspoon kosher salt

Directions

  1. Preheat the oven to 350 degrees F. Line a 13×9″ baking pan with foil and coat well with nonstick cooking spray. Set aside.
  2. Toss the oats on a sheet pan and bake for 10 to 12 minutes, stirring occasionally, until lightly browned.  Reduce the oven temperature to 300 degrees F.
  3. Transfer the oats to a large mixing bowl and stir in the almonds, puffed rice, and dried fruit.
  4. Place the butter, honey, brown sugar, vanilla, almond extract, and salt in a small saucepan and bring to a boil over medium heat. Cook and stir for a minute, then pour over the toasted oatmeal mixture.
  5. Pour the mixture into the prepared pan. Wet your fingers and press the mixture firmly and evenly into the pan. Bake for 20-25 minutes at 300 degrees F, until light golden brown. Cool for at least 2 to 3 hours before cutting into squares. Serve at room temperature.

                    Sunday, April 28, 2013

                    Chocolate Covered Strawberry Pop-Tarts From Scratch


                    I really like of Pop-Tarts, so when I saw a recipe for making them from scratch, I knew I had to try.

                    I used a basic pastry dough recipe from Flour by Joanne Chang, and then put homemade strawberry balsamic jam between two rectangles of it.  I then baked it and coated the pastries with chocolate glaze and sprinkles.

                    It wasn't really a Pop-tart, but it was delicious.  They reminded me of flakier, butterier versions of the Pillsbury Toaster Strudel.  But of course, these were much better than those treats you get from the freezer.  

                    These do require a little time and effort to make.  You have to refrigerate the dough for at least four hours before using it, and I suggest that if you have  warm kitchen, you should return the dough to the refrigerator a couple of times while you're cutting out rectangles.  Otherwise, the butter will melt and it'll be much harder to make  a good looking toaster pastry.

                    You can use store-bought jam, but I decided to make my own jam from fresh strawberries and balsamic vinegar.  The vinegar really brings out the sweetness from the strawberries.

                    The result has a texture and flavor similar to that of a croissant, only it's not as soft on the inside. I also love the strawberry filling combined with the chocolatey glaze.  I'm definitely going to make these again.  You can mix it up and use any fillings and glazes you want.

                    Enjoy!

                    To make the jam: cook the strawberries with the sugar and vinegar.
                    It's ready when it looks like this.
                    Here's the cooled jam, ready to use.
                    I stored my jam in a Smucker's strawberry jam jar.  (Very resourceful, I know)
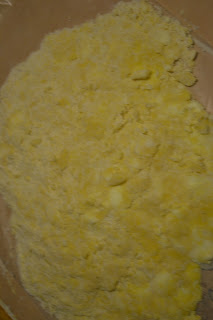
                    To make the dough, mix cold butter pieces with the dry ingredients until incorporated. 
                    Then stir in egg yolks and milk until it forms a shaggy dough.
                    Place the dough on an unfloured surface.  Form a tight mound.
                    Starting from the top of the mound, slide your palm down the mound, flattening the dough.  Repeat for all sides., until you have a flat dough with smears of butter. 
                    Gather up the dough, cover in plastic wrap, press into a disk , and refrigerate for at least 4 hours or up to a couple of days.
                    Divide the dough in half and roll each half into a rectangle.

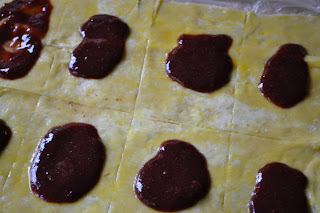
                    Score one rectangle into 8 smaller rectangles and brush this with egg.

                    Put on some jam.

                    Place the other sheet of dough on top, cut into 8 rectangles, then bake.


                    Let the pastries cool.


                    Whisk together the glaze.


                    Pour the glaze on the pastries, put on some sprinkles, let the glaze set, and enjoy!

                    Chocolate Covered Strawberry Pop-Tarts

                    makes 8 large pastries
                    adapted from Flour by Joanne Chang

                    Ingredients

                    For the Pastry Dough:
                    1-3/4 cups (245g) all-purpose flour
                    1 tbs sugar
                    1 tsp coarse salt
                    1 cup (2 sticks/288g) cold unsalted butter, cut into 12 pieces
                    2 egg yolks
                    3 tbs cold milk

                    For the Filling:
                    Strawberry balsamic jam (recipe below) or other strawberry jam

                    For the Glaze:
                    1/2 cup confectioners sugar
                    1/4 cup water
                    1 oz bittersweet chocolate, melted and cooled

                    To Finish:
                    1 egg, beaten
                    sprinkles (optional)

                    Directions

                    1. Make the pastry dough: In a large bowl, whisk together the flour, sugar, and salt.  Mix in the cold butter pieces until the flour is clumpy and there are pecan-sized pieces of butter visible.  Whisk together the egg yolks and milk in a separate bowl, and then add to the flour mixture.  Mix for a few seconds until incorporated and the dough looks shaggy.  On an unfloured surface, form the dough into a tight mound.  Starting from the top, slide your palm down the sides, pressing the dough flat until the butter is smeared and the dough comes together.  Gather the dough into a ball, then wrap in plastic wrap and press into a disk 1" thick.  Refrigerate for at least 4 hours.
                    2. Split the pastry dough in half.  Keeping the other half refrigerated, place on half on a floured surface. Place a sheet of plastic wrap on top and roll the dough into a 14" by 11" rectangle.  Return this half to the refrigerator and roll out the other half of the dough to the same dimensions.  With a knife, score one sheet of dough into 8 smaller 3-1/2" x 5-1/2" rectangles.  Brush this dough with beaten egg and place 2 tbs of jam into the center of each small rectangle.  Carefully place the other sheet of dough on top and lightly pres down.  Cut the dough into 8 rectangles, following the score marks you made.  
                    3. Place each rectangle on a parchment lined baking sheet and bake at 350*F for 30-40 minutes, until the pastries are light golden brown.  Let cool for half an hour.  
                    4. Make the glaze: whisk all the the ingredients for the glaze together in a small bowl until smooth and pourable.
                    5. Pour the glaze on each cooled pastry and then sprinkle the pastries with sprinkles, if desired.  Allow the glaze to set for 10-15 minutes.  
                    6. Store pastries in an airtight container at room temperature for up to 2 days. 

                    Strawberry Balsamic Jam 

                    recipe adapted from Savory Sweet Life

                    Ingredients

                    2 cups chopped strawberries
                    1 cup sugar
                    2 tbs balsamic vinegar

                    Directions


                    1. Add the chopped strawberries, sugar, and balsamic vinegar to a large pot. Simmer until strawberries are tender, about 20 minutes, stirring occasionally. 
                    2. If you have an immersion blender, puree strawberries right in the pot until slightly smooth but still slightly chunky. If you don’t have an immersion blender, transfer the mixture to a food processor or blender and pulse until desired consistency, then add the mixture back to the pot.
                    3. Bring the mixture to a gentle boil, and cook for 30 minutes, allowing the mixture to thicken. Stir frequently to ensure the mixture doesn’t burn on the bottom of the pot. It's ready when it's thick enough that when you stir, you can see the bottom of the pot.