Showing posts with label vanilla. Show all posts

Sunday, August 11, 2013

Vanilla Macarons with Peach Buttercream

           Macarons could be my next favorite baking trend.  They may not be as reliable as my cupcakes, or as easy to make.  In my mind, they had always been in a higher, "fancier" class of desserts, and could only be made on very special occasions. After making the French cookies a few times, though, I have realized that the process can be quite simple, and the result is just as versatile and crowd-pleasing as cupcakes. Macarons even have the same hand-held dessert appeal as the famous, ubiquitous cupcake.

            I entered these macarons in my county's annual fair for the "miscellaneous cookies" category.  The macaron has a simple, vanilla bean shell which I left white.  Then, I made a buttercream with puree from peaches that my family had just picked that day.  To assemble, pipe a bit of jam onto one cookie, pipe a buttercream border around that, and then place another macaron shell on top.  It's recommended that you wait at least 24 hours before eating the macaron to give the flavors time to mature.

             The process is the same for most macaroons:  sift together dry ingredients, beat egg whites with sugar, fold in the dry ingredients, pipe into circles, let rest, and bake.  Once you get a feel for it, it isn't hard at all.  Just remember to make accurate measurements and to follow directions with precision.

Sift together almond flour (or ground almonds) and powdered sugar. 
Place egg whites in a bowl with the granulated sugar and vanilla bean seeds. 
Beat to soft peaks (don't over-beat)
Fold in dry ingredients until they are well-incorporated and the batter flows like lava (don't over-mix or under-mix)
Pipe batter onto a clean sheet of parchement paper or a silicon baking mat. Tap the pan a few times on the counter to eliminate air bubbles.
Wait 30 minutes to 1 hour for a soft "shell" to form on the surface of the macaron.  It will take the longer amount of time if your kitchen is humid.  
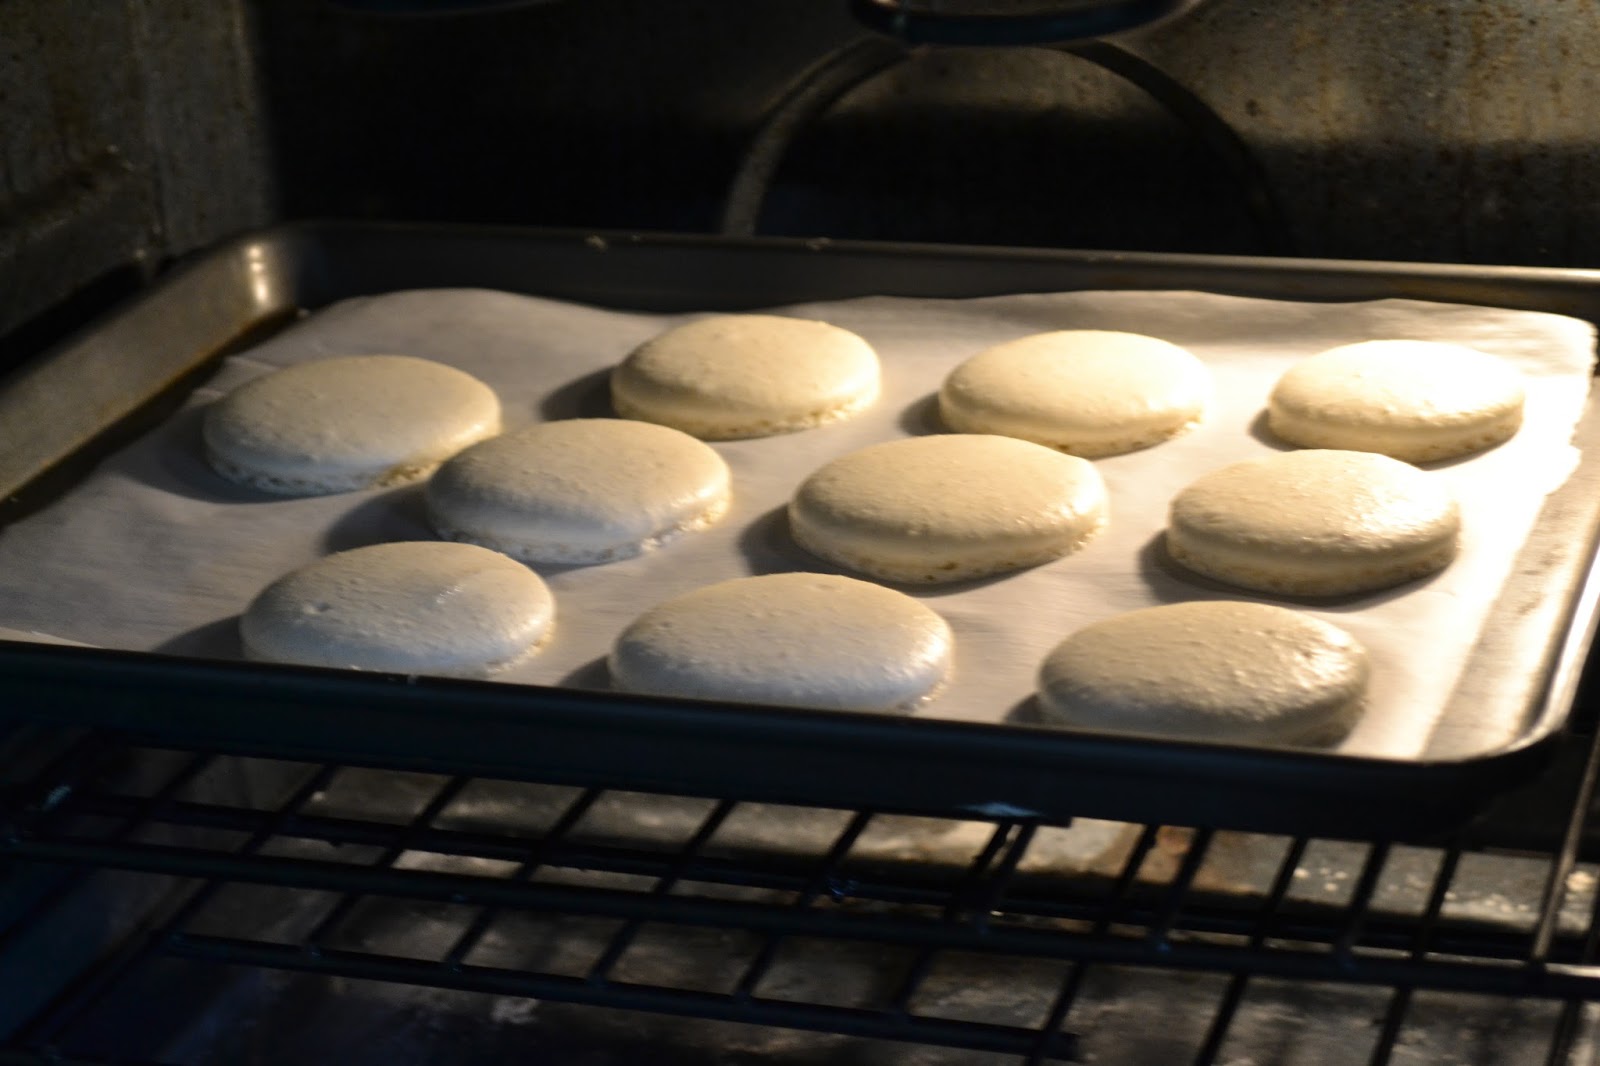
Bake in a 300*F oven for 10-12 minutes, and then let cool.  
To make the buttercream, puree some peach slices in a blender.  
Whip up a mixture of butter, confectioners sugar, vanilla, and salt, and then beat in the peach puree.
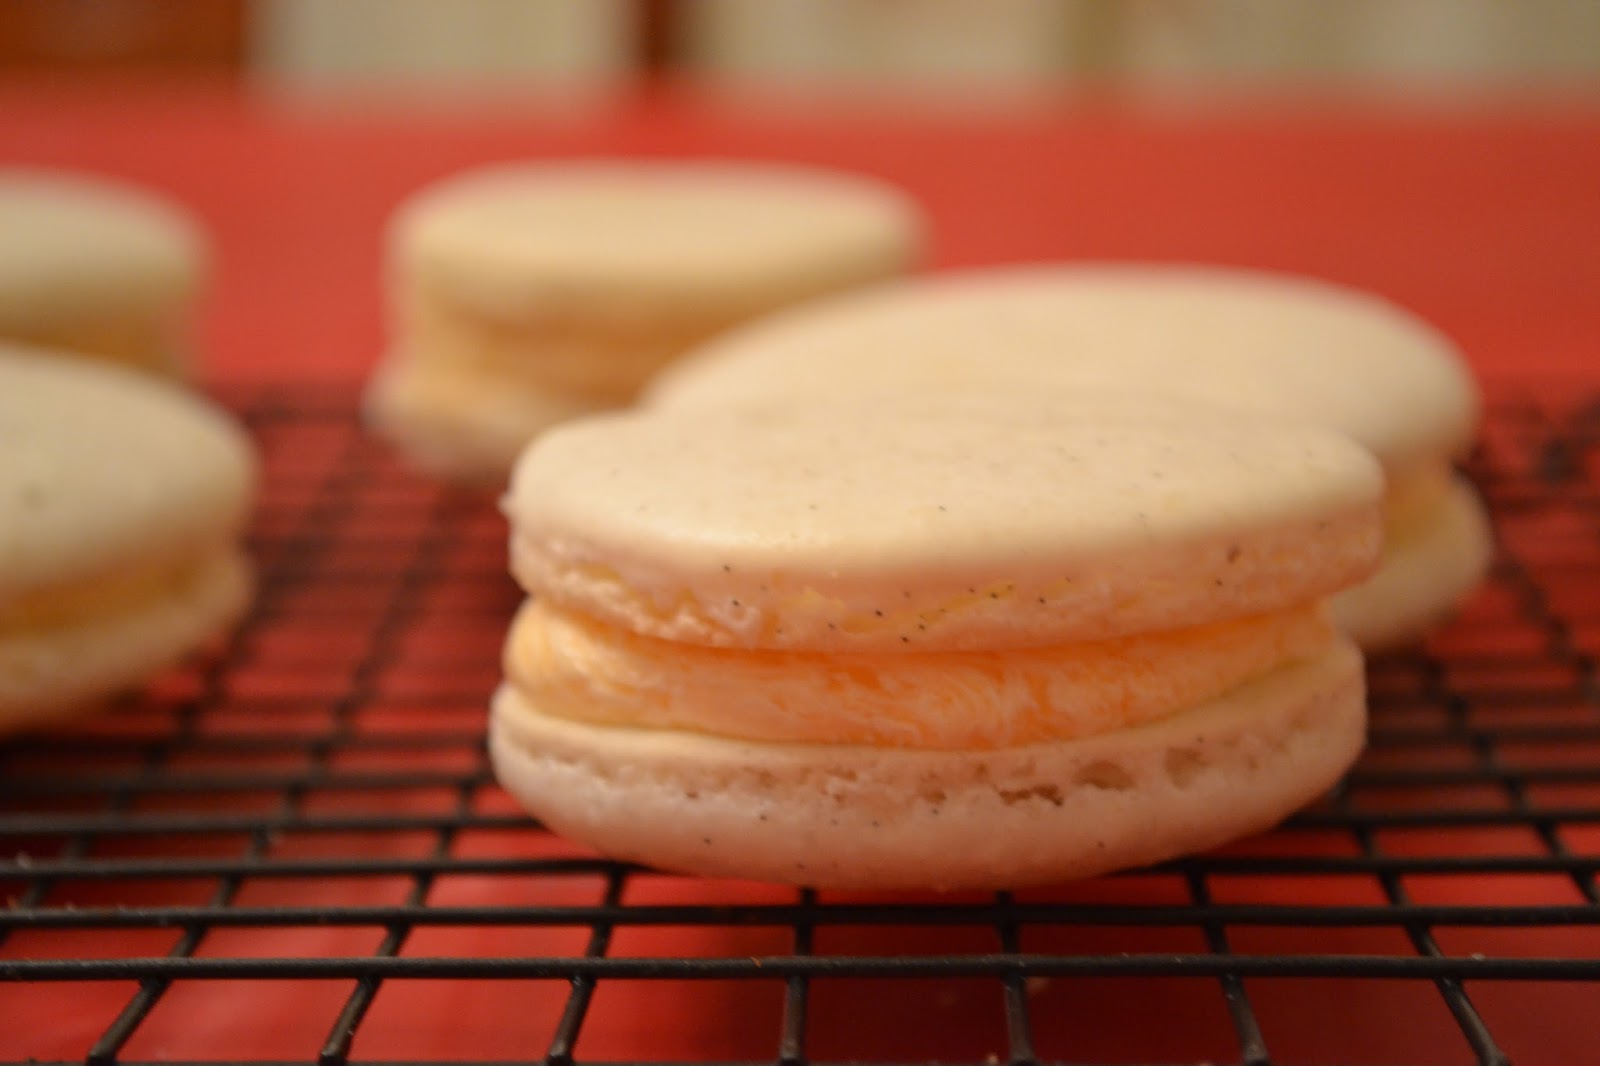
Pipe the buttercream and jam onto one macaron shell, and then place the other shell on top.  
                    Next time you make dessert for a special event, why not try macarons?  

                    Enjoy!

Vanilla Macarons with Peach Buttercream

makes 6-8 large macarons
adapted from Annie's Eats

Ingredients

For the macaron shell:
110 grams almond flour (or blanched almonds ground in a food processor)
200 grams confectioners sugar
100 grams egg whites, at room temperature
1 vanilla bean, split open
50 grams granulated sugar
For the peach buttercream:
¾ cup butter, at room temperature
1 ½ cups confectioner’s sugar
pinch of salt

1/4 tsp vanilla extract
¼ cup peach puree

apricot or peach jam (optional)

Directions

  1. Sift together the almond flour and confectioner's sugar in a medium bowl.
  2. Place egg whites in a large bowl and whisk until foamy.  Add seeds from the vanilla beans and granulated sugar.  Beat on high speed until you have a glossy meringue that holds soft peaks. 
  3. Fold the dry ingredients into the egg whites until they are thoroughly incorporated and the batter flows like lava.  Place the batter into a piping bag fitted with a large round tip. 
  4. Line 2 baking sheets with clean parchment paper or silicon mats. Pipe the batter into 1-1/2" rounds. Tap the baking sheets on the counter a few times to eliminate air bubbles.  Let sit for 30 minutes to 1 hour, until the surface of the batter is slightly dry. 
  5. Heat oven to 300. Bake one sheet of macarons for 10-12 minutes. Repeat with the other pan.  Let shells cool completely. 
  6. Make the buttercream: Beat together the butter and sugar until light and fluffy, and then beat in the vanilla and salt.  Beat in the peach puree until the frosting is thick.  
  7. If desired, pipe a small amount of jam onto the flat side of one macaron shell.  Then pipe a border of buttercream around the jam and place another macaron shell on top.  Repeat for the rest of the macaron shells. 
            

Thursday, May 30, 2013

Graduation Cake


      My sister graduated today, and I'm really happy for her.  So, to say congrats, I made her a cake instead of saying it directly to her face because I knew that she heard "congrats" a bazillion times already.  I'm going to miss her weirdness next year.  She's going to a college that is pretty far away from my house, but I know we'll video chat often (hopefully).  


     I decided to make a square cake because I've never actually make one before and it just seems right for graduation.  You know, birthday cakes can be round, but graduation cakes just seem like a rectangular kind of cake (and squares are rectangles).  Our school colors are blue, white and yellow, so I made a vanilla cake filled with homemade lemon curd and store-bought blueberry jam and iced with vanilla butter cream.  

Lemon curd is easy to make.  Just cream together some ingredients and cook it over a stove.

It's done cooking when it leaves a trail on the back of a wooden spoon like this.

Then you just refrigerate it until it thickens.
    The cake is perfectly tender, soft, and dense.  It's the ideal vanilla layer cake.  It's simple to make and tasty.  The lemon curd turned out well, and so did the frosting.  The recipe makes enough buttercream to give the cake a thin coat of frosting, but if you love frosting, you should double the recipe.  The buttercream is my go-to vanilla frosting.  It's rich, creamy, and sweet. Perfect for any cake/cupcake.  I'm really happy with how the cake turned out, even though the frosting was kind of sloppy (I couldn't find my piping tip!).


     I made a figurine resembling my sister.  You know, both have brown hair and a light blue graduation gown.  A few tips on making fondant decorations:  (1) Use toothpicks to hold up your figure and attach it to the cake. (2) NEVER put your decorations in the freezer or refrigerator.  The fondant may harden at first, but once you take it out, it will start sweating and become really sticky and gross.  I think it's because since the fondant is cold, a lot of water condenses on the fondant and sticks to the surface.  It's best just to leave the fondant at room temperature lightly covered in plastic wrap.  If you want it to harden, don't cover it.  

     I'm still trying to grasp the fact that my sister is going to college and that I'll be like an only child (except for my brother).  Also, I can't believe that I'll be graduating in just three years!  

To make the cake:

Whisk together the flour, sugar, baking powder, and salt.
Stir in the butter.
Add vanilla and milk.
Beat in eggs.
Prepare a pan.
Spread batter in.
Bake and cool.

Vanilla Layer Cake

enough to make 1 9x13 cake, 2 9" rounds, 3" 8" rounds, 3 9"x9" squares, or 2 dozen cupcakes
recipe modified from King Arthur Flour

Ingredients

2 cups (397g) sugar, preferably superfine or castor sugar (or granulated sugar pulsed in a blender until fine)
3 1/4 (390g) cups all-purpose flour
2 1/2 teaspoons baking powder
1 teaspoon salt
3/4 cup (170g) unsalted butter, soft
1 1/4 cups milk, at room temperature
2 teaspoons vanilla extract
4 large eggs, room temperature

Directions

  1. Preheat the oven to 350°F. Lightly butter and flour cake pans.  Line with wax or parchment paper and grease and flour that.  
  2. In a large mixing bowl, whisk together the sugar, flour, baking powder, and salt.
  3. Add the butter and beat with an electric mixer at low speed, until the mixture looks sandy.
  4. Combine the milk and vanilla and add, all at once. Mix at low speed for 30 seconds, then increase the speed to medium and beat for 30 seconds. Scrape the sides of the bowl.
  5. With the mixer running at low speed, add 1 egg. Increase the speed to medium and beat for 30 seconds. Repeat with the second egg. Continue adding the eggs, scraping after each addition, until all 4 are added.
  6. After the last egg is added, scrape the bowl once more, then beat at medium-high speed for 30 more seconds.
  7. Transfer the batter to the pans of your choice. For layers, divide the batter equally among the pans. Smooth out the tops with an offset spatula. The whole batter weighs 48 oz so if you have a kitchen scale, you can make sure you divide the batter equally.
  8. Bake for 40 minutes for a 9" x 13" pan; 27 minutes for 9" layers; 20-25 minutes for 8" layers, or 18-23 minutes for cupcakes. The cake is done when it's golden brown around the edges and just beginning to pull away from the edge of the pan. A toothpick inserted in the center will come out clean.
  9. Remove the cake and cool in the pan for 20 minutes, then remove the cake and let it cool completely before frosting.

Vanilla Buttercream

makes about 2-1/2 cups, enough to frost 12-24 cupcakes or one small cake depending on how much frosting you like
modified from Savory Sweet Life

Ingredients

1 cup (2 sticks, 8oz) unsalted butter, softened 
3-4 cups confectioners sugar, sifted
¼ teaspoon salt
1 tablespoon vanilla extract
1 to 4 tablespoons milk or heavy cream

Directions

  1. Beat butter until smooth and creamy.  
  2. Add 2 cups of powdered sugar and slowly mix with the butter until incorporated. 
  3. Increase mixer speed to medium and beat in the vanilla extract, salt, and 1 tablespoons of milk/cream. 
  4. Beat in another 1-2 cups of confectioners sugar until incorporated, and then increase the mixer speed and whip the frosting for 3 minutes.
  5. For stiffer icing (good for piping) use more sugar. For thinner icing (good for spreading) add more milk or cream.

Lemon Curd

makes about 2 cups

Ingredients

3 oz. (6 Tbs.) unsalted butter, softened at room temperature
1 cup sugar
2 large eggs
2 large egg yolks
2/3 cup fresh lemon juice
1 tsp. grated lemon zest

Directions

  1. In a large bowl, beat the butter and sugar with an electric mixer, about 2 min. Slowly add the eggs and yolks. Beat for 1 min. Mix in the lemon juice. The mixture will look curdled, but it will smooth out as it cooks.
  2. In a medium, heavy-based saucepan, cook the mixture over low heat until smooth. Increase the heat to medium and cook, stirring constantly (you don't want it to burn), until the mixture thickens, about 15 minutes.  It should leave a path on the back of a spoon and will read 170°F on a thermometer. Don't let the mixture boil. 
  3. Remove the curd from the heat; stir in the lemon zest. Transfer the curd to a bowl. Press plastic wrap on the surface of the lemon curd to keep a skin from forming and chill the curd in the refrigerator. The curd will thicken further as it cools. Covered tightly, it will keep in the refrigerator for a week and in the freezer for 2 months.


Saturday, March 23, 2013

Bird's Nest Cupcakes {Vanilla Cupcakes}

    Hi everyone!  The first day of spring was last...Wednesday, I think?  Spring's my favorite season (it's the season of my birthday!), and I'm glad it's finally here.  However, it still feels like winter here and the weatherman's calling for a couple of inches of snow on Monday.
    No wonder I've been sick all last week.  I guess you could call it "spring fever" (pun intended).
    Anyways, to welcome this so-called "spring," why not make some delicious vanilla cupcakes resembling little birds nests?   I've been in the mood for cupcakes all week.  And I've been planning to make these cupcakes since I saw my cupcake-themed calender's picture for March.  I really like cupcakes.
     So first I baked some vanilla cupcakes.  But not just any vanilla cupcakes, these are the perfect vanilla cupcakes.  The cupcakes that make your taste buds weep tears of happiness.  Except your tongue doesn't actually cry, because that would be gross.
     The cupcakes have a poignant vanilla flavor and soft, fluffy texture.  No other vanilla cupcake can compare.  The recipe has been genius-ly put together by the Cupcake Project blog.  It uses milk, sour cream, butter, and oil.  It's like a hybrid of all vanilla cupcakes.
      Then I whipped up some of my favorite chocolate fudge frosting.  I made half of the recipe found here.  But you can use any frosting you want, I just wanted a dark brown frosting for the nests.
       Nest, I spread some frosting on the cooled cupcakes (see what I did there?)  Make sure that the cupcakes are cool or else the frosting will melt. Then I used a grass piping tip to pipe a ring around the border.  I added some jumbo-sized quins from a craft store to look like eggs.  I remember that once when I was younger, I found a birds nest with a blue robin egg in it and I was absolutely fascinated by it.  I then proceeded to go home and put a hard-boiled egg in a pile of blankets, hoping that the egg would some day hatch.
Mix together the sugar and vanilla bean seeds.
Whisk together the dry ingredients, then stir in the sugar and butter.
Whisk together the wet ingredients.
Combine wet and dry.
Slowly stir in milk.
Pour into baking cups.
Bake in the oven.
Let cool. 
Frost.
Pipe on the "nest"
Add sprinkles.
Enjoy!

       So, happy spring, everyone!  Enjoy!

Perfect Vanilla Cupcakes

makes about 16 cupcakes
recipe from  The Cupcake Project

Ingredients


1 cup (225 grams) granulated sugar
1 vanilla bean
1 3/4 cups (175 grams) cake flour, not self-rising
1 1/2 teaspoons baking powder
1/2 teaspoon baking soda
1/2 teaspoon salt
1/4 cup (57 grams) unsalted butter, room temperature
2 large eggs, room temperature
1/3 cup (75 grams) full-fat sour cream
1/4 cup canola oil or vegetable oil (60 ml)
1 tablespoon pure (not imitation) vanilla extract
2/3 cup (160 ml) whole milk

Directions


  1. Preheat oven to 350 F.
  2. In a small bowl, combine sugar and seeds from the vanilla bean. ( Watch this video to learn how to get the seeds out of the bean.)
  3. Using the back of a spoon, move around the bowl and apply pressure to break up any clumps of seeds and to better infuse the vanilla flavor into the sugar. Set aside.
  4. In a medium-sized mixing bowl or bowl of a stand mixer, mix together cake flour, baking powder, baking soda, and salt.
  5. Add the vanilla bean sugar and mix until well combined.
  6. Add butter and mix on medium-low speed for three minutes.  Because there is so little butter, you'll end up with a very fine crumb texture.
  7. In a small mixing bowl, whisk together eggs, sour cream, oil, and vanilla extract until smooth.
  8. Add the egg mixture to the flour mixture and beat on medium speed until just combined.
  9. Slowly add milk and mix on low speed until just combined.  The batter will be liquid. 
  10. Fill cupcake liners just over 1/2 full.
  11. Bake for 14 minutes and then test to see if they are done. They are done when a toothpick comes out without wet batter stuck to it.  The cupcakes should appear white with specks of vanilla bean. They should not turn a golden brown.  If they are not done, test again in two minutes.  If they are still not done, test again in another two minutes.
  12. When the cupcakes are done, remove them immediately from the tins and leave them on a cooling rack (or just on your counter if you don't own a cooling rack) to cool.