Sunday, February 17, 2013

Strawberry Whole Wheat Pancakes

 
    I love mornings, don't you?
    You wake up just as the sun is rising and everything is quiet and fresh.  Then, you have the whole day ahead of you.
    I like waking up early, before anyone else is up.  I feel like I can do anything that I want.  And oftentimes that means making breakfast.
    I never have time to make pancakes on school days, so on the weekends, I like to take full advantage of my time.  Nothing beats starting the day with a stack of soft, fluffy pancakes.  It puts you in a good mood for the rest of the day, guaranteed.


    And I love flipping pancakes. I used to really want to be a professional pancake-flipper, seriously.  And waffles? No.
    Strawberry pancakes are my favorite. Whenever a restaurant I go to serves them, I have to order it: pancakes topped with whipped cream and strawberries, with a sprinkling of powdered sugar.  I think it's been my favorite dish since I was five.
   Usually, though the strawberries aren't actually in the batter.   And these pancakes I made are a bit healthier, since they use whole wheat flour and flax.  Flax seed meal actually gives the pancakes a great, nutty taste while replacing some of the oil.
    Make sure that you cut the strawberries nice and thin so that they don't stick to the pan and stay in the pancake. And my dad always told me that the pan is ready for some batter when a drop of water sizzles on the pan.  Don't ever press down on the pancake with the spatula, as that would cause it to lose some of the fluffiness.
    Enjoy!

Strawberry Whole Wheat Pancakes

serves about 4 people
adapted from Adventures in Cooking

Ingredients

1 cup whole wheat flour or whole wheat pastry flour
1/4 cup flax meal
1/4 cup sugar
1-1/2 tsp baking powder
1/2 tsp baking soda
1/4 tsp salt
1/2 tsp cinnamon
1 large egg
1-1/4 cup buttermilk (or stir 1 tbs white vinegar with enough milk to make 1-1/4 cups, let sit 5 minutes)
1/4 cup vegetable or canola oil
1/4 tsp vanilla extract
about 1-1/3 cups fresh strawberries, sliced thinly

Directions

  1. In a medium bowl, whisk together flour, flax, sugar, baking powder and soda, salt, and cinnamon.
  2. In a large bowl, whisk together the egg, milk, oil, and vanilla.
  3. Slowly add the dry ingredients to the wet and stir until the flour is moistened. Then stir in the strawberries just until combined. 
  4. Heat a pan/griddle over medium low heat until a drop of water sizzles on it.  Grease with a bit of butter or cooking oil, and then ladle on some batter.  
  5. When little holes appear around the edges and the edges are fluffy, flip the pancake and cook until both sides are golden brown.  Repeat with the rest of the batter.


Thursday, February 14, 2013

Fondue for Four: Made Without Alcohol or a Fondue Pot

 
   I had fondue once before: a time my dad decided to take my sister and me out for a treat.  I all can say is that this fondue I made today was so much tastier. I really enjoyed the taste of fresh, homemade bread melding with a creamy brie without the weird taste of alcohol.
   Fondue is delicious.  It's stuff dipped in cheese, after all.  But if you thought that there wasn't anyway it could go wrong, than you were in fact wrong.  
   No, you can't just melt cheese and dip bread in it. You have to make sure that you add corn starch to the room temperature cheese and slowly melt it over low heat in a saucepan rubbed with garlic. Then, you have to add at blend of milk, lemon juice, and seasonings.  The exact amounts don't matter that much, though, and it largely depends on your tastes. You can use dry wine instead of the milk and lemon juice if you want.
   You're supposed to transfer the cheese mixture to a fondue pot after melting it, but I didn't want to invest in one (and I actually bought one at a yard sale last summer for two dollars but I lost it :( ).  What stops a lot of people from making fondue at home is their lack of a fondue pot, but in actuality they can use a simple saucepan or hot pot.  Making fondue at home is really simple and allows you to enjoy a fun meal without paying a lot of money at a fancy restaurant. The thing about fondue pots is that they can keep the cheese melted for a long time.  If you use a saucepan, you have to reheat the cheese a couple of times, but if you have a hot pot, you just need to turn it on to a really low heat and turn it off when the cheese is melted again.

   
   For the dippers I used fresh whole-wheat bread (made in a bread machine and enhanced with herbs, flax, oats, and sesame seeds), raw juilienned carrots, and blanched baby bella mushrooms and broccoli. You can also use sausage, deli meat, other bread and veggies, or even cubes of cheese if you really like cheese (that would be interesting.) 

   And of course, to end a fondue meal, you need chocolate fondue for dessert.  I just melted some semisweet chocolate and dipped strawberries in it. Happy Valentine's Day everyone!

Brie Fondue without Alcohol

makes about 4 servings

Ingredients

9 oz brie cheese, room temperature and cubed
1 tbs corn starch
1 clove garlic, crushed
1 to 2 tbs lemon juice
about 1 cup of milk
2 tbs green onions, chopped
a pinch of nutmeg
salt and pepper to taste

Directions

  1. Mix the brie with the corn starch until combined.
  2. Slice the garlic clove in half and rub both halves on a small saucepan, and if you're using it, a hot pot or fondue pot.  
  3. Place the cheese into the saucepan and stir over low heat until melted.  Add lemon juice and milk and stir until well combined and smooth.  Then add the green onions, nutmeg, salt, and pepper. Add more milk if the mixture is too hard.
  4. Transfer to hot pot or fondue pot if you have one.  When the cheese starts to cool, reheat it over low heat and stir.
  5. Use the fondue to dip bread (recipe below), veggies, and deli meats.  

Delicious 100% Whole Wheat Bread for the Bread Machine

makes one medium sized loaf
based on recipe byKing Arthur Flour

Ingredients

1-1/4 cup water, room temperature
2 tbs vegetable or olive oil
1/4 cup honey or maple syrup
3 cups whole wheat flour 
1 tbs vital wheat gluten
1/4 cup flax seeds
1/4 cup uncooked oatmeal
1-1/2 tsp salt
1-1/2 tsp instant or active dry yeast
1 tbs black sesame seeds (optional)
1/4 tsp thyme (optional)
1/4 tsp rosemary (optional)

Directions

  1. For bread machine: put all ingredients in pan in order suggested by machine manufacturer.  Select the basic white bread cycle and start. Takes about 4 hours.
  2. Let cool at least 5 minutes before cutting.  Enjoy!


Wednesday, February 13, 2013

Super Sophisticated One-Bowl Chocolate Mocha Cake Truffles


   These are not cake balls.  
   They are not the "cake pops" you bake in a machine. 
   These are the kind of cake truffles that at first make you think, "What has our society come to?" But then, "Who were the geniuses who thought of this?"
   What is is it? It starts with a simple chocolate cake (do not use box mix, from scratch is just as easy and tastes so much better).  Then, mix it up with a cup of frosting (I used mocha flavored).  Freeze spheres of the mixture and then coat them in smooth, melted chocolate. Oh yeah, and you need sprinkles.  Trust me on this.
   The result: chocolate heaven.  It's so rich and decadent, but it's portion control, right? Seriously, go make these.  It's for your own good. Unless, of course, you have dietary restrictions.   


   How to make a friend instantaneously: give someone a cake truffle. (Truffle just sounds so much more sophisticated than "ball."  "Cake spheres" is also acceptable.  And, yes, chocolate cake mushed up with icing is sophisticated.)
   You could also put these on a stick and call them cake pops, but really, it's just so much more awkward eating these like lollipops. Really, are you supposed to lick them?
   
You wanna know how to make these? Well, of course you do. And bonus: you only need one bowl. Less dishes to clean *woot*!
First, make a really easy-peasy one-bowl chocolate cake.
Bake it in any kind of pan you want.
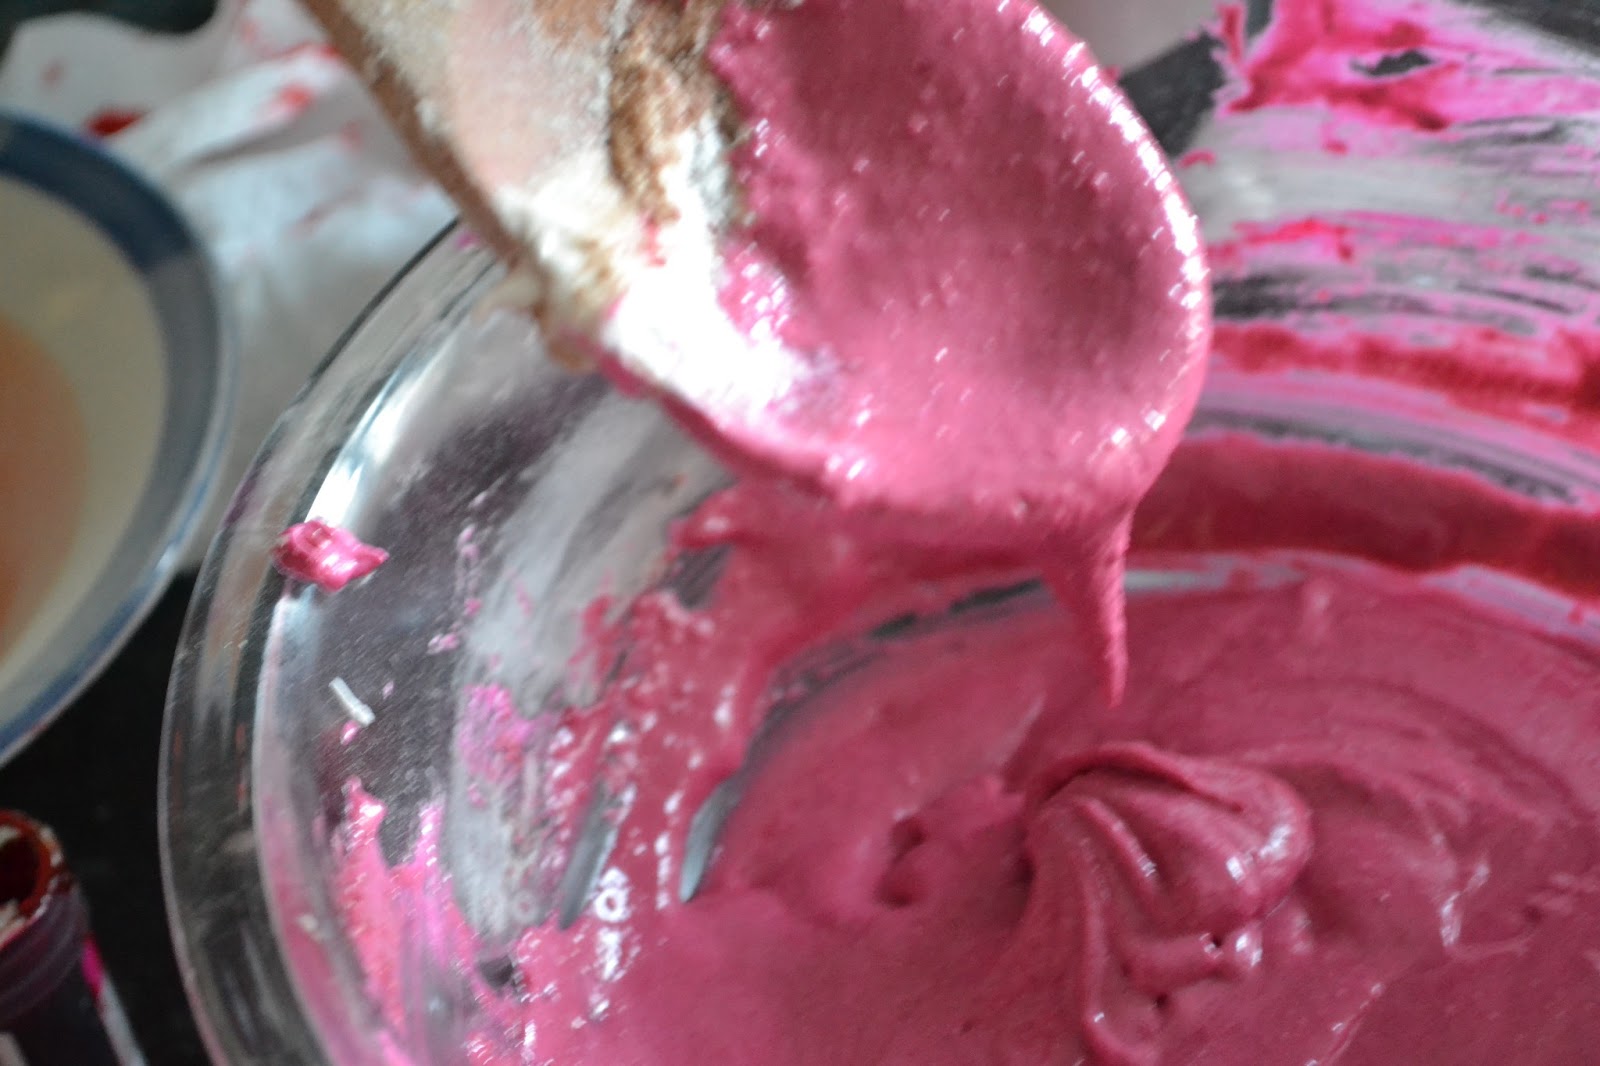
Make the super delicious frosting. (I cleaned the bowl I used for the cake batter--not cheating)
This...do it. Dump the cake into the bowl with the frosting. You  don't have to wait for the cake to cool down, in fact,  it's easier to shape it if the cake is warm.
                                      
Yes.
Spheres--Freeze these for at least 4 hours, or overnight. Otherwise, they will lose their shape.
Melt some good quality baker's chocolate using the double boiler method. This has a better flavor than those candy melts you can buy at craft stores.You need about 12oz.
I should have made the batter in a glass bowl so that I could have melted the chocolate in the same bowl (washed.)


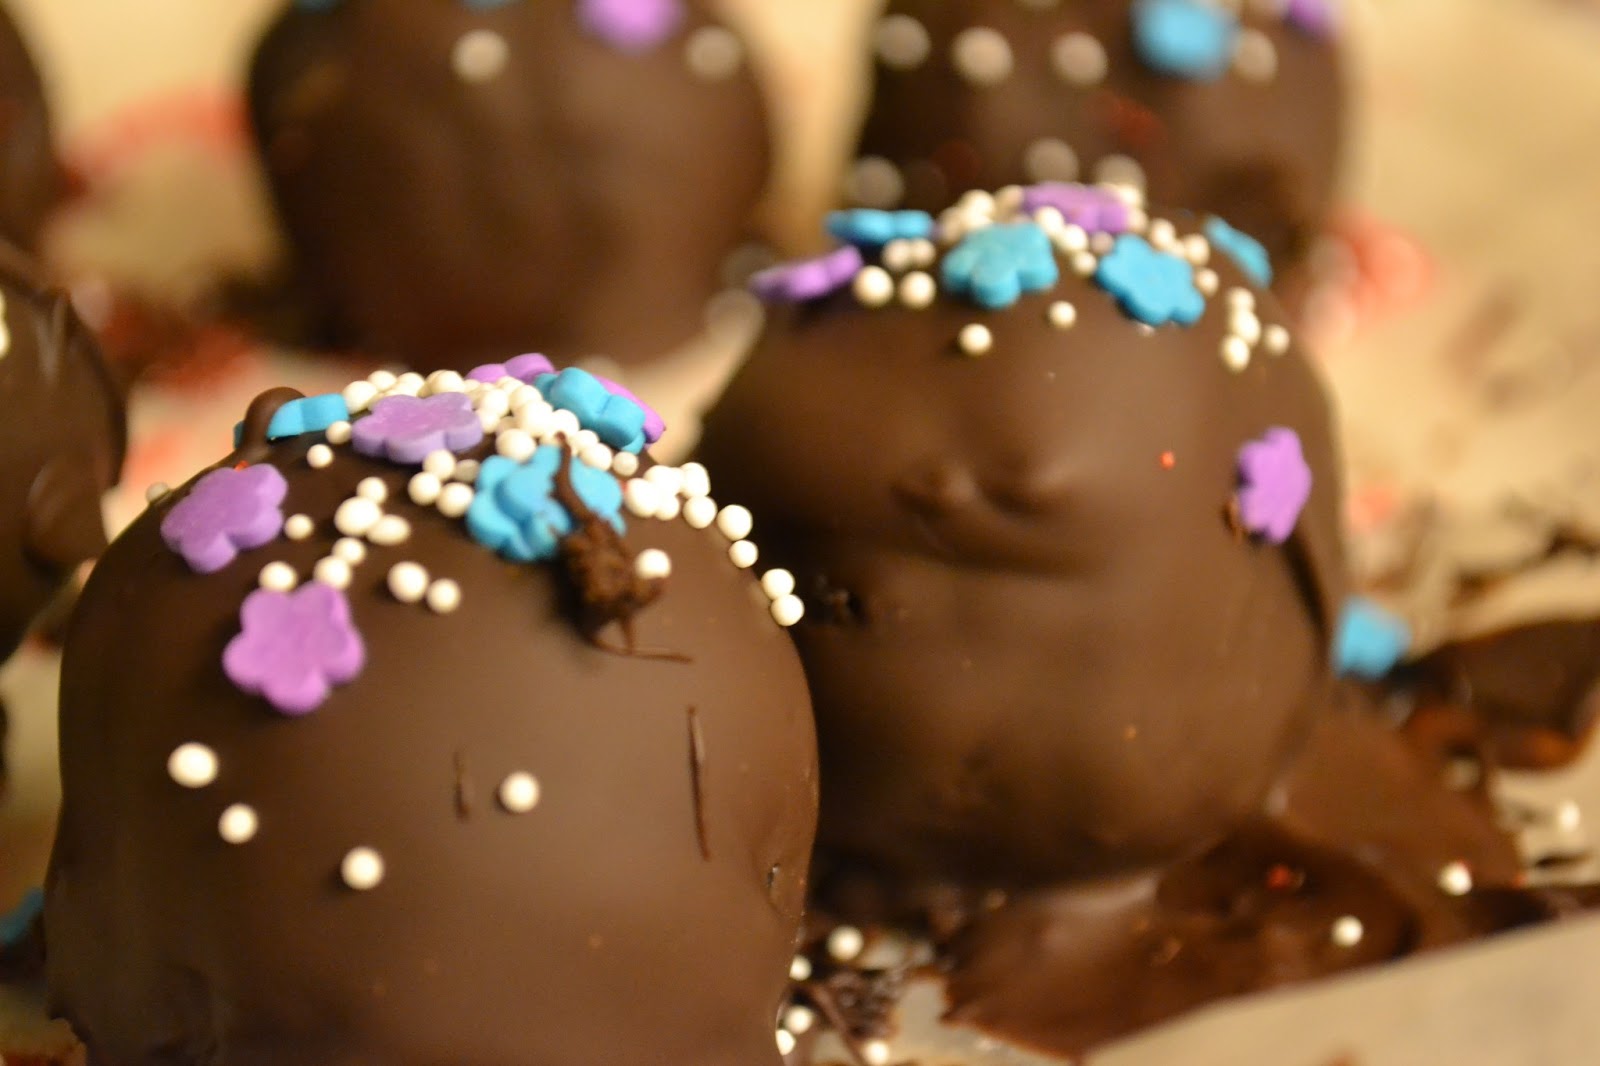
  Finally, dip the chilled cake spheres into the chocolate. Spoon chocolate over the areas you can't reach.  Place the cake truffles on wax paper until the chocolate hardens. Feel free to use any extra chocolate to cover some strawberries or any thing else you can find in your kitchen.
  These are so much better than actual chocolate truffles.

Chocolate Cake Truffles/Sphere/Ball/Pops

makes about 24 1.5" spheres

Components

1/2 recipe One-Bowl Chocolate cake (below) or other cake of choice
1/2 recipe Mocha Buttercream (below) or other frosting of choice
12 oz good quality semisweet baker's chocolate, chopped into small pieces

Assembly

  1. Dump the cake into the bowl with the frosting while the cake is still warm.  Mix with a wooden spoon until well combined.  Shape into 24 1" balls (about 1/8 cup of the mixture).  Place balls on plates lined with wax paper and cover with plastic wrap. Freeze for at least 4 hours or up to 24 hours. 
  2. Bring a pot of water, with a glass or metal bowl on top, to a simmer over low heat.  Make sure that the water doesn't touch the bottom of the bowl.  Add the chocolate and stir constantly until melted and smooth. Remove from heat, but keep the bowl over the warm water so that the chocolate stays melted.
  3. Dip the chilled cake spheres into the chocolate one at a time.  You can use a spoon or meat fork to do this.  Use a spoon to pour chocolate over the areas you missed.  Let excess chocolate drip off and place cake truffle onto a plate lined with wax paper. Decorate with sprinkles while the chocolate is melty.
  4. I suggest that you keep the cakes you aren't dipping in the freezer to keep them cold.
  5. Let chocolate on cakes harden before enjoying.

One-Bowl Chocolate Cake

makes 2 9" round cake layers
adapted from All Recipes

Ingredients

2 cups white sugar
1-3/4 cups all purpose flour
3/4 cup unsweetened cocoa powder
1-1/2 tsp baking powder
1-1/2 tsp baking soda
1 tsp salt
2 eggs
1 cup whole milk
1/2 cup vegetable or canola oil
2 tsp vanilla extract
1 cup boiling hot water or coffee (coffee brings out the chocolate flavor)

Directions

  1. Preheat oven to 350*F. Butter and flour two pans lined with wax or parchment paper.
  2. Whisk together the sugar, flour, cocoa, baking powder, baking soda, and salt.
  3. Add eggs, milk, oil, and vanilla. Beat with a mixer or by hand for 2 minutes.
  4. Slowly pour the hot water or coffee into the bowl in a thin stream while mixing the batter.
  5. Pour the batter evenly among pans and bake in preheated oven for 30-35 minutes, until a toothpick comes out clean.
  6. Let cake cool in pan for 10 minutes before removing. (If making cake truffles, you don't need to let it cool and you only need half the recipe).

Mocha Buttercream

makes about 2 cups, which frosts 12 cupcakes (halve if using to make mocha cake truffles)
adapted from Brown Eyed Baker

Ingredients

1 cup (2 sticks) unsalted butter, room temperature
2-1/2 cups powdered sugar (sifting optional)
1-1/2 tsp vanilla extract
1-1/2 tsp instant espresso powder

Directions

  1. Beat room temperature butter for a minute or two until it is creamy.
  2. Add the sugar bit by bit, beating until well combined after each addition.
  3. Scrape the sides of the bowl once all the sugar's added and whip for 2-3 minutes until fluffy.
  4. Add the vanilla and espresso and whip until combined.

Dinosaur Love Story *rawr*


Monday, February 11, 2013

Red Velvet Macarons with Chocolate Ganache Filling

   This is why I love February 14th.
   This is my second time making macarons. I was at first a bit intimidated when I came across Not So Humble Pie's troubleshooting guide. I mean, there are so many things that can go wrong.  Now that I've made them a couple of times, though, I think that they're pretty simple.
     A lack of certain materials prevented me from making macarons earlier.  To make them, you'll need a kitchen scale (to make exact measurements), a piping bag, a mixer, and almond flour. Almond is kind of expensive and hard to find. I got mine from a health food store. You can make your own by putting almonds in a food processor, but you'll need a nice machine to make it fine enough.
    Also, superfine (or castor) sugar is suggested for this recipe. It will make the texture of the macaron less grainy since it has smaller grains.  However, it's almost impossible to find in stores, so you can just pulse regular sugar in a blender or food processor for a minute until it's powdery.
    Another side note: many macaron makers suggest that you use aged egg whites. These are egg whites that are put in a bowl covered with a damp paper towel in the refrigerator for a few days.  This isn't essential, though, and I just used room temperature egg whites.
     To be honest, though, even if they don't look perfect, there's a 99% chance that the macarons will taste good and that everyone will forgive you.
     Anyways, I made these for Valentines Day, as you may have guessed.  Also, you may not know this, but they satisfy not one, but two of the things on my list in the 2013 tab.  Namely: "something red velvet" and "macarons."  I don't really like using food coloring (how I was raised), but red velvet and macarons both need it. By combining them, I have saved myself the trouble of using a lot of food coloring twice :).
      Before you make the macarons, make sure you remember these things:

  • Make exact measurements and measure by weight, not volume.
  • Wipe your bowl and beaters with lemon juice to help the egg whites whip up better.  
  • Don't over beat the egg whites; it'll make the macarons grainy.
  • Don't over or under mix the batter.  The batter should drip off the spoon in ribbons when you lift it, but shouldn't be too liquidy.
  • Tap the pans after you pipe the batter to prevent cracking.
  • Let the piped macaron batter sit on the baking sheets for 30 minutes to 2 hours (depending on humidity) until it is firm on the outside.
  • Only bake one sheet at a time.
  • Refrigerate for a couple of days before eating to improve the flavor. 
     Now you're ready to make an awesome macaron!
This is what superfine sugar should be like.
Soft peaks
Batter should drip in ribbons.
Pipe the shapes with a piping bag fitted with a large round tip.

I printed out some heart shapes on paper and put them under  the parchment paper to make piping easier. Don't forget to remove the templates after the macarons have set for 30 minutes!

Make sure you let the batter set for at least 30 minutes (depending on humidity) until the surface is firm.
After baking. See the feet!

Really simple ganache filling.
 Enjoy! I hope that you have a wonderful Valentines Day filled to the brim with chocolate!

Red Velvet Macarons with Chocolate Ganache filling

makes about 25 heart-shaped macarons (50 cookies, more if shaped like circles)
modified from Edible Mosaic

Ingredients

8 oz powdered (confectioners) sugar
4 oz almond meal (almond flour)
1/2 oz (12g, 2tbs) unsweetened cocoa powder 
A couple pinches of salt
5 oz egg whites (from 4 eggs) room temperature
3 oz superfine (castor) sugar (or blended granulated sugar)
1/2 teaspoon vanilla extract
1 tsp red food coloring (I used Wilton icing colors--it's more concentrated)

1/2 cup heavy cream
4 oz bittersweet or semisweet chocolate, chopped

  1. Line two pans with parchment paper.
  2. In a medium bowl, sift together almond meal, powdered sugar, cocoa powder, and salt. Discard any almond pieces that are too large.
  3. In a glass or stainless metal bowl, whip the egg whites for a few seconds until frothy.  Gradually add superfine sugar while still beating the egg whites.  Whip egg whites to soft peaks.
  4. Add vanilla and food coloring to egg whites and beat for a few seconds just until incorporated.
  5. Add a bit of the dry ingredients to the egg whites and gently fold in with a spatula. Fold in a circular motion until incorporated. Keep adding the dry ingredients this way until it's all incorporated.  Fold the mixture until it's thin and drips from the spoon like a ribbon, but isn't too liquidy.
  6. Place batter into a piping bag with a large, round tip.  Pipe the batter in even sized shapes onto the baking sheets lined with parchment paper. Lift the pans a couple inches above the table and drop.  Repeat about five times to eliminate air bubbles and prevent cracking.
  7. Let pans rest for 30 minutes to an hour until a dry shell forms on the surface. One it is formed, preheat the oven to 300*F.  
  8. Bake one sheet at a time, for 10-15 minutes depending on the size of the macarons. Remove from oven and let cool completely.
  9. To make the filling, bring the heavy cream to a boil.  Remove from heat and stir in the chocolate until melted and blended.  Whip with a beater until cool and stiff.  
  10. Pair up cookies with similar sizes.  Pipe or spoon some filling onto one cookie and gently press the other half on top.
  11. Refrigerate for a day or two to improve the flavor before serving.  Refrigerate for up to 2 weeks. 


Sunday, February 10, 2013

Dumplings 饺子

   
     As I mentioned earlier, I have been making Chinese food to celebrate Chinese New Year. Today I will be sharing a recipe for traditional dumplings.
     I tell you, there are a lot of genius things in this world, and wrapping meat in dough and boiling it is one of them.  There are a lot of different kinds of dumplings out there, but to me, this is the only real one.
     Like many of the foods I make, this recipe is inspired by my grandma.  Only until I made these dumplings myself could I really appreciate how amazing she is at making them.  She can swiftly roll out a perfect circle of dough and wrap the dumpling before you can blink.  That comes with experience, I guess.
     Dumplings are one of my favorite foods, and if you've tried them before, you'll know why.  The outside is chewy and the inside is flavorful and moist.  I like the pork and vegetable kind, but any type of filling works. You can also pan-fry them or steam them, and they'll be delicious in a new, wonderful way.  I'm always in the mood for dumplings.
     Jiaozi, or dumplings are a Chinese New Year tradition.  In Chinese class, I learned that the name originated from "jiaozi," the first paper currency in China.  Dumplings were shaped like Chinese gold ingots, and therefore eating them symbolized wealth.
     There are two different ways to wrap dumplings: the popular Northern way (commonly seen in cartoons) and the Southern way (shaped more like gold ingots).  My family always does it the second way.


      For some fun, I put a chestnut in one of the dumplings so that whoever got it would have "good fortune" for the year.  My older sister got it.  It's kind of like putting a baby in a king cake for Mardi Gras.
       I hope you enjoy!

Chinese Dumplings 饺子

makes about 40 dumplings

For the Wrapper

3-1/8 cups all-purpose flour (1/8 cup = 2 tbs)
1 cup hot water (175*F)
1/2 cup room temperature water
  1. Slowly pour hot water over flour while stirring quickly.  Stir quickly until all the water is incorporated.
  2. Add the room temperature water little by little, mixing until incorporated. The dough will be sticky.
  3. Knead the dough on a floured surface until smooth and firm, about 10 minutes. Add flour if necessary.
  4. Place dough in an oiled bowl and cover with plastic wrap.  Let sit for 10-15 minutes.
  5. Divide into about 40 equal pieces (a scale makes this easier). Roll pieces into a ball.
  6. Flatten the ball with your hand. Use a rolling pin to roll from the middle to the outside edge of the ball. Rotate the dough and repeat until you have a circle.

For the Filling

1 small head of nappa cabbage (about 12 oz), chopped into very small pieces or processed in food processor
1/2 tsp salt
1/4 cup of Chinese Chives, cut into small pieces
1 tsp freshly grated ginger
2/3 lb ground meat (chicken, pork, turkey)
A pinch of white pepper
1-2 tbs soy sauce
1 tbs rice cooking wine or sherry
2 tsp sesame oil
  1. Sprinkle the salt onto the cabbage and let sit for 10 minutes. This helps to draw the moisture out of it. 
  2. In a medium bowl, mix the meat with the remaining ingredients.  
  3. Squeeze out as much water as you can from the cabbage. Then mix it in to the meat mixture. Mix well.
  4. For more flavor, let the filling marinate for a few hours in the refrigerator before filling the dumplings.

Assembly

wrappers
filling
small dish of water
  1. Place a small spoonful of filling into the center of the wrapper.
  2. Use your finger to brush some water around the edge of the dumpling wrapper.
  3. Fold the wrapper in half and pinch together the edges.
  4. Pinch the two corners together or pinch the seam together in a wavy pattern.
  5. Fill a large pot halfway with water and bring to a boil.  Add some of the dumplings and close the lid until it is boiling again.  Boil for about 5 minutes. The dumplings are ready to eat when they are floating.
  6. Serve warm and with vinegar. Freeze or refrigerate uncooked dumplings.